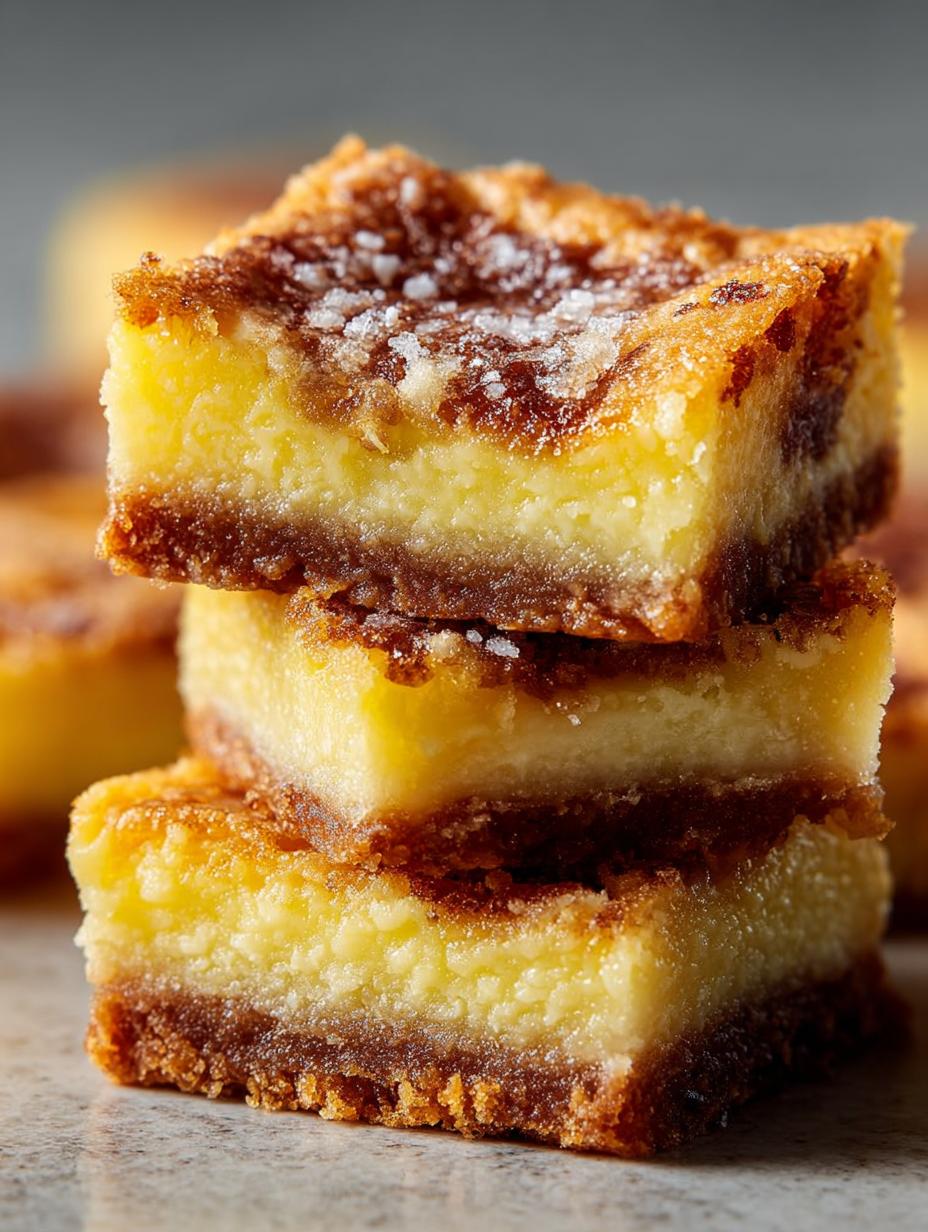
Ooey Gooey Butter Bars have a special place in my heart, reminding me of childhood visits to my grandma’s house. I can still recall the sweet, buttery aroma wafting from her kitchen, a scent that always promised pure delight. She’d pull out these golden squares, the tops still slightly jiggly, and I’d eagerly await my turn for a taste of that rich, soft interior. This Easy Ooey Gooey Butter Bars recipe captures that exact magic, making it possible for anyone to recreate those nostalgic moments. I promise you, these homemade St. Louis Gooey Butter Cake bars are incredibly simple to whip up. Let’s get cooking!
Why You’ll Love These Ooey Gooey Butter Bars
I know you’ll fall in love with these delightful bars for so many reasons. They’re more than just a dessert; they’re an experience!
- They offer an incredibly rich, sweet, and unbelievably gooey texture that melts in your mouth.
- The prep time is minimal, making them perfect for busy weeknights or last-minute cravings.
- These are truly the Best Ooey Gooey Butter Bars you’ll ever make, guaranteed to impress everyone.
- You don’t need a huge budget for ingredients; they’re surprisingly affordable to whip up.
- They’re a huge hit with kids and adults alike, making them ideal for family gatherings.
- This is a Simple Ooey Gooey Butter Bars recipe, so even novice bakers can achieve perfect results.
- The aroma alone will fill your home with comforting, sweet goodness.
Ingredients for Homemade Ooey Gooey Butter Bars
Gathering your ingredients is the first step to creating these incredible treats. I’ve found that using quality ingredients makes all the difference for a truly rich butter bars recipe. Here’s what you’ll need for these decadent bars:
- 1 (18.25 ounce) package yellow cake mix – This forms the delicious, sturdy base.
- 1 egg – To bind the crust mixture together perfectly.
- 1/2 cup (1 stick) unsalted butter, melted – For that essential buttery richness in the crust.
- 1 (8 ounce) package cream cheese, softened – Make sure it’s at room temperature for a smooth, lump-free filling.
- 2 eggs – These help create that signature gooey texture in the top layer.
- 1 teaspoon vanilla extract – A touch of vanilla enhances all the sweet flavors.
- 1 (16 ounce) package powdered sugar – The key to the sweet, dense, and gooey topping.
- 1/4 cup (1/2 stick) unsalted butter, melted – Added to the topping for extra richness and moisture.
These simple ingredients come together to create the most delightful Ooey Gooey Butter Bars you could imagine!
How to Make Ooey Gooey Butter Bars
Making these delightful bars is a straightforward process, and I promise you’ll find it incredibly satisfying to watch them transform in your oven. Follow these steps for perfect Ooey Gooey Butter Bars every time:
- Step 1: First, you’ll want to preheat your oven to 350°F (175°C). While it’s heating, take a moment to lightly grease a 9×13 inch baking pan. This ensures your delicious bars won’t stick, making for easy removal later.
- Step 2: In a large mixing bowl, combine the yellow cake mix, one egg, and 1/2 cup of melted butter. Mix these ingredients together until they are just well combined. You’ll notice it forms a thick, cookie-dough-like consistency – this is the foundation for your rich, buttery crust.
- Step 3: Press this cake mix mixture evenly into the bottom of your prepared baking pan. I like to use my fingers to really get it into all the corners, creating a nice, uniform base for your Ooey Gooey Butter Bars.
- Step 4: Now, let’s prepare the irresistible topping! In another large bowl, beat the softened cream cheese with the two remaining eggs, vanilla extract, and the entire 16-ounce package of powdered sugar. Beat until the mixture is beautifully smooth and free of lumps.
- Step 5: Stir in the remaining 1/4 cup of melted butter into your cream cheese mixture. Make sure it’s fully incorporated; this adds that extra layer of richness to the gooey topping. This is what gives these their signature texture, creating truly Classic Gooey Butter Bars.
- Step 6: Carefully pour the cream cheese mixture over the cake mix crust in the baking pan. Spread it gently to cover the entire surface. Don’t worry if it looks a little thick; it will spread out as it bakes.
- Step 7: Bake your Ooey Gooey Butter Bars for 40 to 50 minutes. You’re looking for the edges to be golden brown, but the center should still be slightly jiggly. This is crucial for that perfect gooey consistency; you don’t want to overbake them! This method ensures you get the Original Ooey Gooey Butter Bars.
- Step 8: Once baked, remove the pan from the oven and let the bars cool completely on a wire rack before cutting them into squares and serving. Resist the urge to cut them warm, as they need time to set up for that ideal texture. Enjoy these incredible treats!

Pro Tips for the Best Ooey Gooey Butter Bars
I’ve made my fair share of these delightful treats, and I’ve picked up a few tricks along the way that I’m excited to share with you. These tips will help ensure your Ooey Gooey Butter Bars turn out absolutely perfect every single time, giving you that rich, irresistible dessert you’re aiming for.
- Always use softened cream cheese for the topping. If it’s cold, you’ll end up with lumps, and nobody wants lumpy gooey butter bars!
- Don’t overmix the crust. Just combine until it comes together, otherwise, it can become tough.
- Grease your pan thoroughly. This makes cutting and serving your delicious bars so much easier.
- The baking time is crucial; keep an eye on them. The center should still have a slight jiggle, which is the secret to their famous gooey texture.
- Let them cool completely! I know it’s hard, but warmth makes them too soft to cut neatly.
What’s the secret to perfect Ooey Gooey Butter Bars?
The real secret lies in not overbaking them. You want the edges golden, but the center should still be slightly jiggly when you pull them from the oven. This ensures that signature gooey, almost custard-like texture in the topping, making for a truly indulgent chewy butter squares dessert that everyone will adore.
Can I make Ooey Gooey Butter Bars ahead of time?
Absolutely! These Ooey Gooey Butter Bars are fantastic for making in advance. You can bake them a day or two before you plan to serve them. Simply let them cool completely, then cover them tightly with plastic wrap or foil. They’ll keep beautifully at room temperature, making your party prep a breeze!
How do I avoid common mistakes with Ooey Gooey Butter Bars?
To avoid common pitfalls, first, ensure your cream cheese is soft; this prevents a lumpy topping. Second, don’t overbake; a slightly jiggly center means ultimate gooeyness. Finally, resist cutting them warm; letting them cool completely will give you clean, perfect squares of these delightful Ooey Gooey Butter Bars.
Best Ways to Serve Ooey Gooey Butter Bars
These delightful Ooey Gooey Butter Bars are fantastic on their own, but I’ve discovered a few ways to elevate the experience even further. They’re such decadent butter bar treats that a little extra touch can make them truly unforgettable.
For a simple yet elegant presentation, I often dust them with a little extra powdered sugar right before serving. It adds a lovely finish and a hint of extra sweetness. Another favorite is to serve them slightly warm with a scoop of vanilla bean ice cream. The contrast between the warm, gooey bar and the cold, creamy ice cream is simply divine.
If you’re feeling a bit fancy, a drizzle of raspberry coulis or a sprinkle of fresh berries like raspberries or blueberries can add a wonderful tart counterpoint to the sweetness. These pairings truly highlight the richness of these buttery squares, making them perfect for any special occasion or just a cozy night in.

Nutrition Facts for Ooey Gooey Butter Bars
I know many of you are curious about the nutritional breakdown of these delicious treats. While these Ooey Gooey Butter Bars are definitely an indulgence, here’s an estimated look at what each serving contains, based on the recipe making 24 bars:
- Serving Size: 1 bar
- Calories: 250
- Fat: 12g
- Saturated Fat: 7g
- Trans Fat: 0.3g
- Unsaturated Fat: 4g
- Carbohydrates: 35g
- Fiber: 0.5g
- Sugar: 35g
- Protein: 3g
- Cholesterol: 40mg
- Sodium: 180mg
Nutritional values are estimates and may vary based on specific ingredients, brands, and preparation methods used for these Ooey Gooey Butter Bars.
How to Store and Reheat Ooey Gooey Butter Bars
Once your irresistible Ooey Gooey Butter Bars have cooled completely, proper storage is key to keeping them fresh and delicious. I always let mine cool fully on a wire rack before doing anything else; trying to move them too soon can be messy!
For short-term storage, place the cut bars in an airtight container at room temperature for up to 3 days. If you prefer them chilled or need them to last longer, they’ll keep beautifully in the refrigerator for up to a week. Just make sure the container is sealed well to prevent them from drying out.
These gooey dessert bar recipes are also fantastic for freezing! Wrap individual bars tightly in plastic wrap, then place them in a freezer-safe bag or container. They will last for up to 3 months in the freezer. To enjoy them again, thaw at room temperature or warm gently in the microwave for that fresh-baked gooeyness. A quick zap in the microwave brings back that incredible, warm texture beautifully.
Frequently Asked Questions About Ooey Gooey Butter Bars
Why are they called Ooey Gooey Butter Bars?
The name perfectly describes their incredible texture! These bars feature a firm, buttery crust topped with a sweet, custard-like filling that remains wonderfully soft and “gooey” even after baking. It’s that irresistible, melt-in-your-mouth quality that earned them their memorable name. When you take a bite, you’ll understand exactly why they’re called Ooey Gooey Butter Bars.
What are Ooey Gooey Butter Bars?
Ooey Gooey Butter Bars are a classic American dessert, originating from St. Louis, Missouri. They consist of two distinct layers: a dense, buttery cake-mix-based crust on the bottom, and a rich, sweet, and incredibly gooey topping made primarily from cream cheese, powdered sugar, and eggs. They’re baked until the edges are golden and the center is set but still soft, creating a truly unique and decadent treat.
Can I use a different cake mix for Ooey Gooey Butter Bars?
Absolutely! While a yellow cake mix is traditional for Ooey Gooey Butter Bars, you can certainly experiment with other flavors. A chocolate cake mix would create a delicious chocolate version, or a white cake mix for a purer vanilla flavor. Just ensure the package size is similar to maintain the correct crust consistency. Feel free to get creative with your flavor combinations!
How do I get the perfect gooey center?
The key to that signature gooey center for your Ooey Gooey Butter Bars is not to overbake them. You want the edges to be golden brown and set, but the middle should still have a slight jiggle when you gently shake the pan. As they cool, the center will continue to set up, but it will retain that wonderfully soft, creamy, and “ooey gooey” texture that makes them so beloved.
Variations of Ooey Gooey Butter Bars You Can Try
While the classic recipe for Ooey Gooey Butter Bars is undeniably perfect, I’ve found that these treats are also incredibly versatile! If you’re feeling adventurous or catering to different tastes, there are several delicious variations you can explore. These twists on the traditional recipe can offer new flavor experiences while keeping that beloved gooey texture.
- Chocolate Lovers’ Version: Swap the yellow cake mix for a chocolate cake mix in the crust, and even add a tablespoon of cocoa powder to the cream cheese filling. This creates a rich, decadent chocolate Ooey Gooey Butter Bar that’s perfect for chocoholics.
- Lemon Zest Edition: For a brighter, tangier treat, add 2-3 teaspoons of fresh lemon zest and a tablespoon of lemon juice to the cream cheese layer. This gives your Ooey Gooey Butter Bars a delightful citrusy kick, reminiscent of a sunny St. Louis Gooey Butter Cake bars with a twist.
- Pumpkin Spice Fall Favorite: During autumn, I love to add 1 teaspoon of pumpkin pie spice to the cream cheese mixture and a touch of pumpkin puree (about 1/4 cup) for a seasonal delight. This variation of the cream cheese butter bars recipe is a cozy, comforting treat.
- Nutty Crunch Topping: For added texture, sprinkle about 1/2 cup of chopped pecans or walnuts over the cream cheese layer before baking. This adds a lovely crunch that contrasts beautifully with the gooey interior of your Ooey Gooey Butter Bars.

Ooey Gooey Butter Bars: 1 Painful Mistake to Avoid
- Total Time: 1 hour
- Yield: 24 bars 1x
- Diet: Vegetarian
Description
These Ooey Gooey Butter Bars are a decadent dessert. They feature a buttery crust and a rich, sweet, gooey topping. They are simple to make and perfect for any occasion.
Ingredients
- 1 (18.25 ounce) package yellow cake mix
- 1 egg
- 1/2 cup (1 stick) unsalted butter, melted
- 1 (8 ounce) package cream cheese, softened
- 2 eggs
- 1 teaspoon vanilla extract
- 1 (16 ounce) package powdered sugar
- 1/4 cup (1/2 stick) unsalted butter, melted
Instructions
- Preheat your oven to 350 degrees F (175 degrees C). Lightly grease a 9×13 inch baking pan.
- In a large bowl, combine the yellow cake mix, 1 egg, and 1/2 cup melted butter. Mix until well combined. This forms the crust for your homemade Ooey Gooey Butter Bars.
- Press the mixture evenly into the bottom of the prepared baking pan.
- In another large bowl, beat the softened cream cheese with the 2 eggs, vanilla extract, and powdered sugar until smooth.
- Stir in the remaining 1/4 cup melted butter until fully incorporated into the gooey topping mixture.
- Pour the cream cheese mixture over the cake mix crust in the baking pan.
- Bake for 40 to 50 minutes, or until the edges are golden brown and the center is set but still slightly jiggly. This will give you the best Ooey Gooey Butter Bars.
- Let the Ooey Gooey Butter Bars cool completely before cutting into squares and serving. Enjoy these classic Gooey Butter Bars.
Notes
- For extra richness, use full-fat cream cheese.
- Do not overbake the bars; the center should remain gooey.
- Store leftover Ooey Gooey Butter Bars in an airtight container at room temperature for up to 3 days or refrigerated for up to a week.
- These simple Ooey Gooey Butter Bars are excellent with a dusting of powdered sugar.
- Consider adding a pinch of salt to the crust to balance the sweetness of these rich butter bars.
- Prep Time: 15 minutes
- Cook Time: 45 minutes
- Category: Dessert
- Method: Baking
- Cuisine: American
Nutrition
- Serving Size: 1 bar
- Calories: 250
- Sugar: 35g
- Sodium: 180mg
- Fat: 12g
- Saturated Fat: 7g
- Unsaturated Fat: 4g
- Trans Fat: 0.3g
- Carbohydrates: 35g
- Fiber: 0.5g
- Protein: 3g
- Cholesterol: 40mg
Keywords: Ooey Gooey Butter Bars, Ooey Gooey Butter Bars recipe, Best Ooey Gooey Butter Bars, How to make Ooey Gooey Butter Bars, Easy Ooey Gooey Butter Bars recipe, Homemade Ooey Gooey Butter Bars, St. Louis Gooey Butter Cake bars, Classic Gooey Butter Bars, Original Ooey Gooey Butter Bars, Simple Ooey Gooey Butter Bars, Rich butter bars recipe, Chewy butter squares dessert, Cream cheese butter bars recipe, Decadent butter bar treats, Gooey dessert bar recipes, Southern butter cake bars, Sweet gooey dessert bars