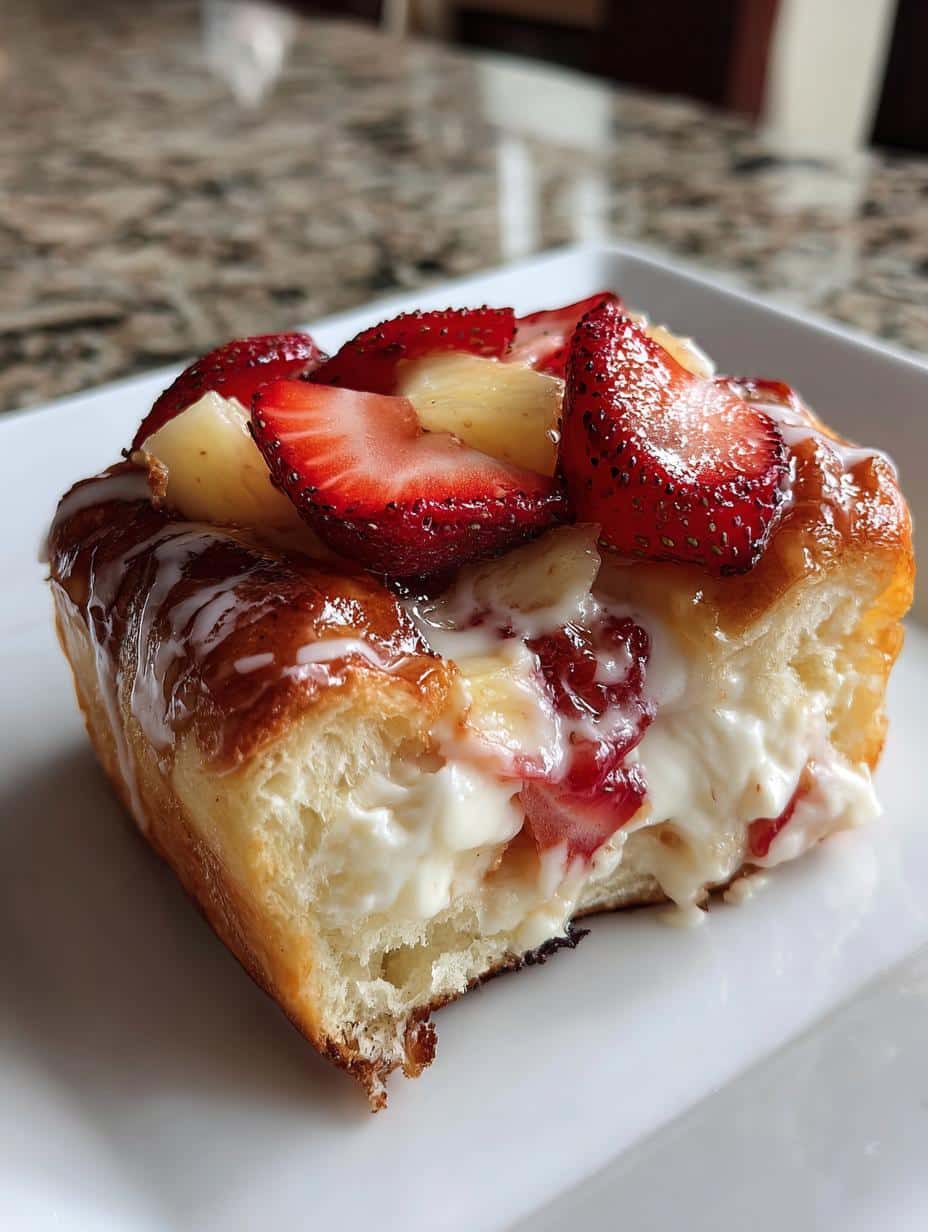
King Hawaiian Cheesecake Danish is a delightful treat that brings together the sweet, pillowy texture of King Hawaiian rolls and the tangy creaminess of cheesecake. As a child, my grandma would always bake a similar dessert using regular bread, and the smell alone would fill our house with warmth. I’ve put my own spin on it, using those iconic sweet rolls and adding fresh pineapple and strawberries for a tropical twist. It’s the perfect dessert for using cheesy garlic chicken wraps. Let’s get cooking.
Why You’ll Love This King Hawaiian Cheesecake Danish
- Sweet and tangy flavor combination: The blend of sweet rolls, creamy cheesecake, and fruity toppings makes every bite a delight.
- Easy to prepare with minimal effort: You’ll be amazed at how quickly this comes together – perfect for those busy days when you crave something special.
- Perfect for breakfast, brunch, or dessert: Seriously, this sweet pastry is versatile! Enjoy it any time of day.
- Uses readily available ingredients: No need to hunt down obscure items; you can find everything at your local grocery store to make this homemade treat.
- A crowd-pleasing dessert that everyone will love: Trust me, this King Hawaiian Cheesecake Danish is always a hit at parties and gatherings.
- Customizable with your favorite fruits: Feel free to swap out the pineapple and strawberries for your favorite seasonal fruits.
- A fun twist on classic cheesecake: Who needs a traditional cheesecake when you can have this delightfully different version?
Ingredients for King Hawaiian Cheesecake Danish
- 1 package King Hawaiian sweet rolls: These are the star! They provide the soft, sweet base for our delightful pastry.
- 1 (8 oz) package cream cheese, softened: This forms the creamy cheesecake filling. Trust me, make sure it’s fully softened, or you’ll end up with lumps!
- 1/2 cup sugar: Sweetens the cheesecake filling. I usually use granulated, but caster sugar works too.
- 1 large egg: This binds all the filling ingredients together, giving it that perfect cheesecake texture.
- 1 teaspoon vanilla extract: Enhances the flavor of the filling. I always use pure vanilla – it makes a difference!
- 1 can (8 oz) crushed pineapple, drained: Adds a tropical sweetness and moisture. Drain it *really* well; otherwise, your **cheesecake danish** will be soggy.
- 1/2 cup strawberries, sliced: These provide a fresh, fruity topping that complements the pineapple beautifully.
- 1/2 cup powdered sugar: This is for the glaze, adding sweetness and a smooth texture. Don’t skip this!
- 1-2 tablespoons milk: To adjust the consistency of the glaze. I usually start with 1 tablespoon and add more until it’s just right.
- 1/2 teaspoon vanilla extract: Just a touch more vanilla to boost the glaze flavor.
How to Make King Hawaiian Cheesecake Danish
- Step 1: Preheat your oven to 350°F (175°C). Trust me, preheating is key for even baking!
- Step 2: Slice the King Hawaiian rolls in half horizontally. You’ll have a top and bottom layer – like a sweet little sandwich. Place the bottom layer in a greased baking dish. It should be a cozy fit, not too cramped.
- Step 3: In a large bowl, beat the softened cream cheese until smooth. No lumps allowed! I like to use my electric mixer for this.
- Step 4: Add the sugar, egg, and vanilla extract. Beat until well combined. The mixture should be light and airy, almost like whipped cream.
- Step 5: Spread the cream cheese mixture evenly over the bottom layer of the rolls. Don’t be shy; get every corner covered!
- Step 6: Sprinkle the drained crushed pineapple over the cream cheese layer. The sweet aroma at this stage is a preview of the deliciousness to come. Make sure to drain the pineapple well, or your **homemade danish** will be soggy.
- Step 7: Place the top layer of the rolls over the pineapple and cream cheese mixture. Gently press down to secure it all together.
- Step 8: Bake in the preheated oven for 25-30 minutes, or until the top is golden brown and the filling is set. Keep a close eye on it; the color is key. You want it a beautiful golden brown, not burnt!
- Step 9: Remove from the oven and let it cool slightly. The filling will firm up as it cools, so resist the urge to cut into it right away (I know, it’s hard!).
- Step 10: In a small bowl, mix the powdered sugar, milk, and vanilla extract until smooth. Adjust the milk to achieve the desired consistency for your glaze – I like mine drizzly but not too runny.
- Step 11: Drizzle the glaze over the warm **cheesecake danish**. Get every bit covered in that sweet, sweet glaze.
- Step 12: Top with sliced strawberries and any additional pineapple if desired. This adds a burst of fresh flavor and makes it look extra pretty.
- Step 13: Cut into squares and serve warm or at room temperature. Enjoy the gooey, sweet goodness! This **King Hawaiian cheesecake dessert** is best enjoyed with friends (or all by yourself – no judgment here!).
Pro Tips for the Best King Hawaiian Cheesecake Danish
Okay, friends, listen up! I’ve made this King Hawaiian cheesecake danish more times than I can count, and I’ve learned a few tricks along the way. These little nuggets of wisdom will take your King Hawaiian dessert from good to absolutely AMAZING. Trust me on this!
What’s the secret to perfect King Hawaiian Cheesecake Danish?
It’s all about not overbaking! The filling should be set, but still slightly soft and jiggly. Overbaking will result in a dry danish, and nobody wants that. I always start checking it around 25 minutes, and then every couple of minutes after that. Remember, ovens vary! A slightly underbaked cheesecake pastry is WAY better than an overbaked one.
Can I make King Hawaiian Cheesecake Danish ahead of time?
Absolutely! This sweet bread pastry is actually great for meal prep. You can assemble the danish ahead of time – right up to the baking step – and store it, unbaked, in the refrigerator. Just make sure to cover it tightly with plastic wrap. Then, when you’re ready to bake, pop it in the oven as directed. I always add the glaze just before serving to keep it fresh and glossy. It’s a total lifesaver when you’re expecting company!
How do I avoid common mistakes with King Hawaiian Cheesecake Danish?
The biggest mistake I see people make is not draining the crushed pineapple thoroughly enough. Excess moisture is the enemy of a perfect homemade cheesecake dessert! I like to press the pineapple between several layers of paper towels to really squeeze out all the juice. Trust me, this extra step is worth it to avoid a soggy bottom (we’ve all been there!). A well-drained pineapple will give you a perfectly moist, but not soggy, King Hawaiian pastry.
Best Ways to Serve King Hawaiian Cheesecake Danish
This King Hawaiian Cheesecake Danish is best served warm or at room temperature – that’s when the flavors really pop! I love to plate each square with a dollop of freshly whipped cream or a scoop of creamy vanilla ice cream for an extra touch of decadence. Trust me, it’s divine! This sweet bread pastry pairs perfectly with a steaming cup of coffee or a fragrant herbal tea, making it ideal for a lazy weekend breakfast or a delightful brunch treat. For dessert, serve it after a light meal; its sweetness is the perfect way to end the evening. You can even add a sprinkle of extra sliced strawberries for a pop of color and freshness. This cheesecake pastry is sure to be a hit no matter how you serve it!
Nutrition Facts for King Hawaiian Cheesecake Danish
Alright, let’s talk numbers! Here’s a peek at what you’re getting in each square of this amazing King Hawaiian cheesecake danish. Keep in mind, these are just estimates, but they’ll give you a good idea. I always think it’s good to know what you’re treating yourself to!
- Calories: 350
- Fat: 18g
- Saturated Fat: 10g
- Unsaturated Fat: 6g
- Trans Fat: 0.5g
- Cholesterol: 60mg
- Sodium: 150mg
- Carbohydrates: 45g
- Fiber: 1g
- Sugar: 30g
- Protein: 5g
Remember, this is an estimate and may vary based on the exact ingredients you use. But hey, a little indulgence never hurt anyone, right? Just enjoy every bite of this delicious sweet pastry!
How to Store and Reheat King Hawaiian Cheesecake Danish
Okay, so you’ve made this amazing King Hawaiian cheesecake danish, and somehow, you have leftovers (I’m impressed!). Here’s how to keep this homemade cheesecake dessert tasting its best. First, let it cool completely. Then, pop it into an airtight container – I swear by my glass ones! It’ll keep in the fridge for up to 3 days. For longer storage, you can totally freeze it! Just wrap individual squares tightly in plastic wrap before popping them in the freezer for up to 2 months. When you’re ready for another slice of this sweet bread pastry, microwave individual portions for 20-30 seconds, or, for the best results, warm it in a preheated oven at 350°F (175°C) for 5-10 minutes until it’s warmed through and the glaze is nice and gooey again. Enjoy!
Frequently Asked Questions About King Hawaiian Cheesecake Danish
Got questions about making the perfect King Hawaiian Cheesecake Danish? Don’t worry, I’ve got answers! Here are a few of the most common questions I get asked, along with my tried-and-true advice. Making this cheesecake pastry should be fun, not stressful!
Can I use other fruits in my King Hawaiian Cheesecake Danish?
Absolutely! While I love the combo of pineapple and strawberries in this sweet bread pastry, feel free to get creative. Berries like blueberries, raspberries, or blackberries work beautifully. Sliced peaches or nectarines are also delicious, especially in the summer. Get wild and make it your own!
- What fruits work best as a substitute for pineapple and strawberries? Stick with fruits that have a similar sweetness and texture. Berries are always a safe bet, and stone fruits like peaches and plums are amazing when they’re in season.
- How does the moisture content of different fruits affect the baking time? Fruits with higher water content, like watermelon or cantaloupe, can make your homemade cheesecake dessert a bit soggy. If you’re using a juicier fruit, you might need to add a little cornstarch to the cream cheese filling to help absorb some of the excess moisture, or even bake it a few minutes longer. Keep an eye on it!
How can I make a healthier version of King Hawaiian Cheesecake Danish?
Okay, so this might not be the *healthiest* dessert in the world, but there are definitely ways to lighten it up! You can use a sugar substitute, like stevia or erythritol, in both the filling and the glaze. You can also swap out the regular cream cheese for a low-fat version – just make sure it’s still softened properly before you beat it. Every little bit helps!
- Are there sugar substitutes that can be used without compromising taste? Stevia and erythritol are good options, but they can sometimes have a slightly different flavor. Monk fruit sweetener is another alternative that many people find tastes very similar to sugar. Experiment and see what you like best!
- Can I use low-fat cream cheese? Yes, you can! It will change the texture of the filling slightly; it might not be quite as rich and creamy. But it’s a great way to cut down on the fat content. Just be sure to soften it completely before using it, or you’ll end up with a lumpy filling. Nobody wants that in their cheesecake pastry!
What can I do if my King Hawaiian Cheesecake Danish is too soggy?
Ugh, soggy desserts are the worst! The most common cause is too much moisture from the pineapple. Make sure you drain it *really* well – I like to press it between layers of paper towels. You can also try baking the danish on a lower rack in the oven, which will help the bottom crust crisp up a bit more. And if all else fails, just embrace the sogginess and call it a “rustic” King Hawaiian dessert! It’ll still taste amazing, I promise.
- How do I drain the pineapple properly? After draining it in a colander, press it between several layers of paper towels to squeeze out as much liquid as possible. You can even use a clean kitchen towel. The drier the pineapple, the better!
- Can I adjust the baking time to reduce moisture? Yes, you can try baking it for a few extra minutes, but keep a close eye on it so it doesn’t burn. You can also try increasing the oven temperature slightly (by about 25 degrees) for the last few minutes of baking. This will help the crust crisp up more quickly. But again, watch it carefully! We want a perfectly baked sweet bread pastry, not a burnt one!
Variations of King Hawaiian Cheesecake Danish You Can Try
Okay, you’ve mastered the original, now let’s get a little adventurous! This King Hawaiian cheesecake danish is a blank canvas for your culinary creativity. Here are a few fun twists to try, whether you’re catering to dietary needs or just looking to spice things up. Get ready to take your cheesecake dessert to the next level!
- Vegan: Swap out the cream cheese for a vegan cream cheese alternative, and use a flax egg substitute (1 tablespoon of ground flaxseed mixed with 3 tablespoons of water) to bind the filling. You won’t believe how delicious a vegan sweet pastry can be!
- Gluten-Free: Finding gluten-free sweet rolls can be a bit of a treasure hunt, but they’re out there! Use them as a substitute for the King Hawaiian rolls, and you’ve got a gluten-free homemade dessert that everyone can enjoy.
- Chocolate Chip: Who doesn’t love chocolate? Add a generous handful of chocolate chips to the cheesecake filling for a richer, more decadent flavor. I recommend semi-sweet or dark chocolate for a balanced sweetness. This King Hawaiian dessert is a chocoholic’s dream!
- Berry Blast: Trade the pineapple and strawberries for a mix of fresh berries like blueberries, raspberries, and blackberries. This will give your cheesecake pastry a burst of vibrant flavor and color. It’s like a party in your mouth!
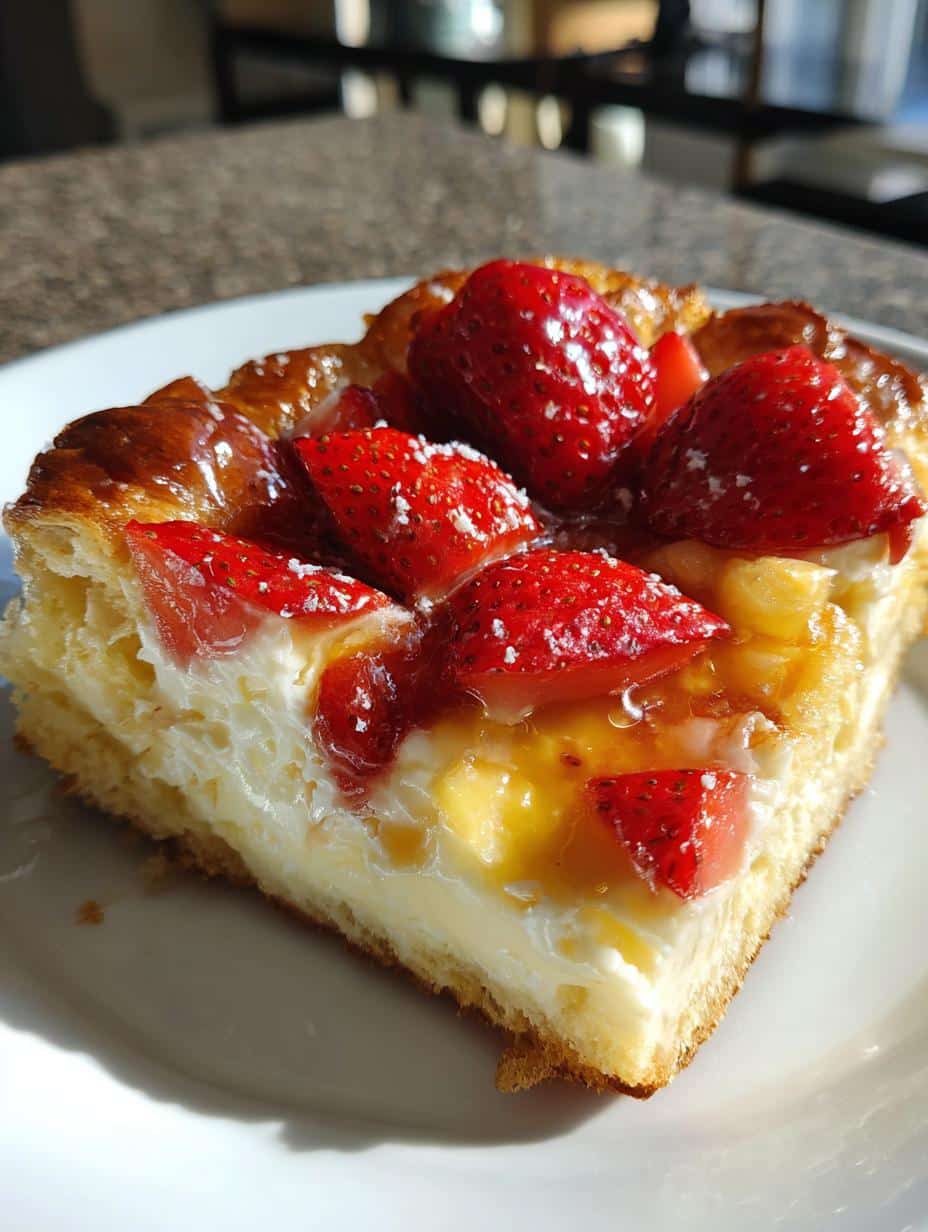

King Hawaiian Cheesecake Danish: Sinfully Easy Treat
- Total Time: 50 minutes
- Yield: 9 servings 1x
- Diet: Vegetarian
Description
King Hawaiian Cheesecake Danish is a sweet treat. It combines the soft texture of King Hawaiian rolls with a creamy cheesecake filling. The addition of pineapple and strawberries provides a fruity flavor.
Ingredients
- 1 package of King Hawaiian sweet rolls
- 1 (8 oz) package cream cheese, softened
- 1/2 cup sugar
- 1 large egg
- 1 teaspoon vanilla extract
- 1 can (8 oz) crushed pineapple, drained
- 1/2 cup strawberries, sliced
- 1/2 cup powdered sugar
- 1–2 tablespoons milk
- 1/2 teaspoon vanilla extract
Instructions
- Preheat your oven to 350°F (175°C).
- Slice the King Hawaiian rolls in half horizontally to create a top and bottom layer. Place the bottom layer in a greased baking dish.
- In a large bowl, beat the softened cream cheese until smooth.
- Add the sugar, egg, and vanilla extract, and beat until well combined.
- Spread the cream cheese mixture evenly over the bottom layer of the rolls.
- Sprinkle the drained crushed pineapple over the cream cheese layer.
- Place the top layer of the rolls over the pineapple and cream cheese mixture.
- Bake in the preheated oven for 25-30 minutes, or until the top is golden brown and the filling is set.
- Remove from the oven and let it cool slightly.
- In a small bowl, mix the powdered sugar, milk, and vanilla extract until smooth. Adjust the milk to achieve the desired consistency.
- Drizzle the glaze over the warm Danish.
- Top with sliced strawberries and any additional pineapple if desired.
- Cut into squares and serve warm or at room temperature.
Notes
- Use softened cream cheese for a smooth filling.
- Drain the crushed pineapple well to prevent a soggy Danish.
- Adjust the amount of milk in the glaze to your preferred consistency.
- Serve warm or at room temperature for the best taste.
- Prep Time: 20 minutes
- Cook Time: 30 minutes
- Category: Dessert
- Method: Baking
- Cuisine: American
Nutrition
- Serving Size: 1 square
- Calories: 350
- Sugar: 30g
- Sodium: 150mg
- Fat: 18g
- Saturated Fat: 10g
- Unsaturated Fat: 6g
- Trans Fat: 0.5g
- Carbohydrates: 45g
- Fiber: 1g
- Protein: 5g
- Cholesterol: 60mg
Keywords: King Hawaiian, cheesecake, danish, dessert, pineapple, strawberries

