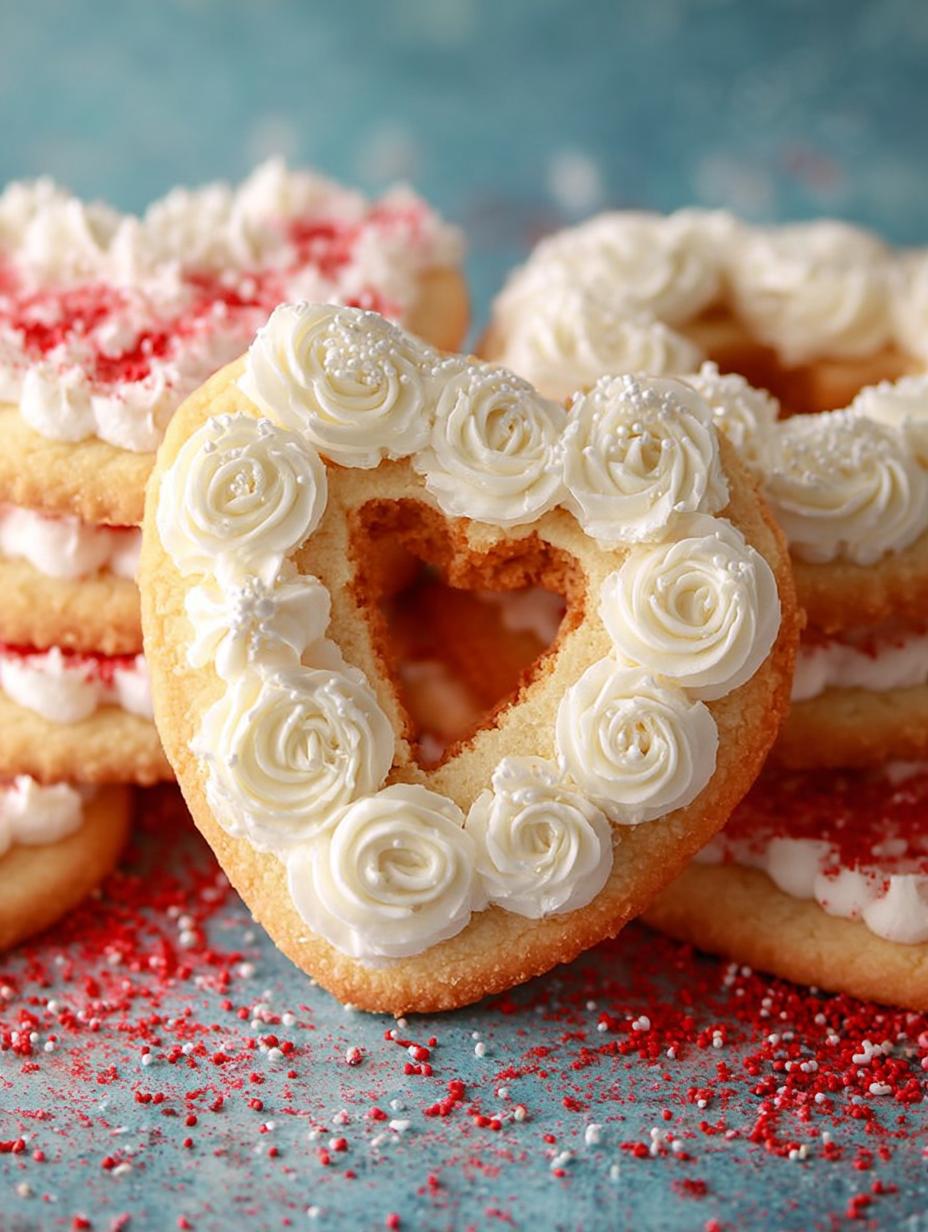
Buttercream Sugar Cookies have become a beloved kitchen staple for many cookie enthusiasts. No need to visit a bakery when you can make perfect sugar cookies at home! Our recipe for foolproof cut-out sugar cookies produces cookies that are crisp around the edges and tender in the center. Top them with a smooth, pipeable buttercream frosting that holds its shape beautifully and is ideal for decorating. This delightful treat is perfect for any occasion, be it birthdays, holidays, or just a sweet indulgence.
Why You’ll Love This Buttercream Sugar Cookies
This recipe offers a variety of delightful benefits that make it a must-try. First, the cookies have a perfect balance of crispy edges and a soft center, ensuring a delightful texture. Second, the buttercream frosting is not only easy to make but can be colored and decorated, making it fun for kids and adults alike. Third, these sugar cookies with buttercream can be customized for any occasion, whether you want simple designs or intricate decorations. They are also vegetarian-friendly, appealing to a wide range of dietary preferences. If you’re looking for an easy way to impress guests, this is the best Buttercream Sugar Cookie recipe for you!
Ingredients for Buttercream Sugar Cookies
Gather these items:
- 19 oz all-purpose flour (4 ¼ cups)
- 1 tsp salt
- 1 tsp baking powder
- 12.25 oz granulated sugar (1 ¾ cups)
- 8 oz unsalted butter (1 cup, at room temperature)
- 2 large eggs (at room temperature)
- 1 tsp vanilla extract (can substitute lemon or almond extract)
- 1 oz sour cream (2 TBSP, at room temperature)
- 8 oz unsalted butter (1 cup, at room temperature)
- 1 TBSP vanilla extract (use clear extract to avoid yellow frosting)
- 1 tsp salt
- 24 oz powdered sugar (6 cups, sift after measuring)
- ¼ cup milk (slightly warmed)
- Gel food coloring (I used Americolor Soft Pink and Super Red)
- Assorted sprinkles (like heart shapes, jimmies, nonpareils, etc)
How to Make Buttercream Sugar Cookies Step-by-Step
- Step 1: Combine the dry ingredients: In a bowl, whisk together the flour, salt, and baking powder, and set aside for now.
- Step 2: Cream the butter and sugar: In the bowl of a large stand mixer fitted with a paddle attachment, combine the butter and sugar, and mix everything together on medium speed until fluffy and well-mixed, about 1-2 minutes.
- Step 3: Add the liquid ingredients: Add the eggs one at a time, beating well after each addition, then add the vanilla extract and sour cream.
- Step 4: Slowly add the dry ingredients: With the mixer running on low, add the dry ingredients gradually, and mix until they’re just about incorporated. Stop the mixer when only a few streaks of flour remain. Scrape the bottom and sides of the bowl with a spatula, and finish mixing all the dough by hand.
- Step 5: Portion the dough: Divide the dough in half. If you want to use a kitchen scale, your dough portions should be about 22 oz each.
- Step 6: Roll out the dough: This is my trick for making rolled-out cookies easier! Roll the dough BEFORE it’s chilled, so you don’t struggle with rolling out rock-hard dough. Place the dough between two sheets of parchment paper, and roll out the dough until it is about 1/4-inch thick.
- Step 7: Chill the dough: Chill the baking sheet with the rolled-out dough for 45 minutes, until the dough is firm.
- Step 8: Cut out the cookies: Preheat the oven to 350 degrees F. Use a cookie cutter to cut out shapes from the chilled dough.
- Step 9: Bake the cookies: Bake the trays of cookies for 8-10 minutes, until the edges are just starting to take on color. Let them cool before decorating.
- Step 10: Beat the butter: Beat the butter for the frosting until creamy and light in color.
- Step 11: Add remaining ingredients for frosting: Add vanilla, salt, powdered sugar, and milk to the butter and mix until creamy.
- Step 12: Color the frosting: Divide the frosting and add gel food coloring as desired.
- Step 13: Pipe onto cookies: Use a piping bag to decorate your cookies with the colored buttercream frosting.
- Step 14: Add sprinkles: Immediately add sprinkles to the frosted cookies for decoration.

Pro Tips for the Best Buttercream Sugar Cookies
Keep these in mind:
- Use room temperature ingredients for best results.
- Chilling the dough is crucial for cut-out shapes.
- For vibrant colors, use gel food coloring.
- Store decorated cookies in a cool place to maintain frosting texture.
- Consider experimenting with different extracts in your dough for unique flavors.
Best Ways to Serve Buttercream Sugar Cookies
These delightful cookies can be served in several ways. You can enjoy them plain or with a simple dusting of powdered sugar. For a more festive touch, serve them with a selection of sprinkles and colorful buttercream toppings, making them perfect for parties or family gatherings. The decorated sugar cookies with buttercream are sure to be a hit with both kids and adults alike.

How to Store and Reheat Buttercream Sugar Cookies
If you have leftover cookies, store them in an airtight container at room temperature for up to a week. For longer storage, place them in the refrigerator. You can also freeze the cookies for up to three months. To reheat, simply let them come to room temperature before serving. This method ensures your buttercream retains its delightful texture.
Frequently Asked Questions About Buttercream Sugar Cookies
What’s the secret to perfect Buttercream Sugar Cookies?
The secret to perfect Buttercream Sugar Cookies lies in using room temperature ingredients and properly chilling the dough. This ensures the cookies hold their shape while baking and allows for easier rolling and cutting. Follow the outlined steps closely for the best results!
Can I make Buttercream Sugar Cookies ahead of time?
Yes, you can make Buttercream Sugar Cookies ahead of time! Prepare the dough and chill it, then cut and bake the cookies. You can also frost them a day in advance, ensuring they’re ready to serve whenever you need them.
How do I avoid common mistakes with Buttercream Sugar Cookies?
To avoid common mistakes, ensure you measure your ingredients accurately and don’t skip chilling the dough. Overmixing can also lead to tough cookies, so mix just until combined. Following these tips will help you create soft Buttercream Sugar Cookies every time.
Variations of Buttercream Sugar Cookies You Can Try
There are numerous variations to make your Buttercream Sugar Cookies unique! You can add different flavor extracts like almond or lemon to the dough. Experiment with various gel colors to create themed cookies for holidays or celebrations. Consider making decorated sugar cookies with buttercream in different shapes and sizes to delight your guests.
For more delicious recipes, check out our latest recipes or try making classic vanilla ice cream to pair with your cookies!
For tips on baking techniques, visit King Arthur Baking for expert advice.
Print
Buttercream Sugar Cookies: 5 Secrets to Perfectly Frosted Treats
- Total Time: 115 minutes
- Yield: 16-18 large cookies 1x
- Diet: Vegetarian
Description
No need to visit a bakery when you can make perfect Sugar Cookies at home! Our recipe for foolproof cut-out sugar cookies produces cookies that are crisp around the edges and tender in the center. Top them with a smooth, pipeable buttercream frosting that holds its shape beautifully and is ideal for decorating.
Ingredients
- 19 oz all-purpose flour (4 ¼ cups)
- 1 tsp salt
- 1 tsp baking powder
- 12.25 oz granulated sugar (1 ¾ cups)
- 8 oz unsalted butter (1 cup, at room temperature)
- 2 large eggs (at room temperature)
- 1 tsp vanilla extract (can substitute lemon or almond extract)
- 1 oz sour cream (2 TBSP, at room temperature)
- 8 oz unsalted butter (1 cup, at room temperature)
- 1 TBSP vanilla extract (use clear extract to avoid yellow frosting)
- 1 tsp salt
- 24 oz powdered sugar (6 cups, sift after measuring)
- ¼ cup milk (slightly warmed)
- Gel food coloring (I used Americolor Soft Pink and Super Red)
- Assorted sprinkles (like heart shapes, jimmies, nonpareils, etc)
Instructions
- Combine the dry ingredients: In a bowl, whisk together the flour, salt, and baking powder, and set aside for now.
- Cream the butter and sugar: In the bowl of a large stand mixer fitted with a paddle attachment, combine the butter and sugar, and mix everything together on medium speed until fluffy and well-mixed, about 1-2 minutes.
- Add the liquid ingredients: Add the eggs one at a time, beating well after each addition, then add the vanilla extract and sour cream.
- Slowly add the drys: With the mixer running on low, add the dry ingredients gradually, and mix until they’re just about incorporated. Stop the mixer when only a few streaks of flour remain. Scrape the bottom and sides of the bowl with a spatula, and finish mixing all the dough by hand.
- Portion the dough: Divide the dough in half. If you want to use a kitchen scale, your dough portions should be about 22 oz each.
- Roll out the dough: This is my trick for making rolled-out cookies easier! Roll the dough BEFORE it’s chilled, so you don’t struggle with rolling out rock-hard dough. Place the dough between two sheets of parchment paper, and roll out the dough until it is about 1/4-inch thick. Place the rolled-out dough, still between the parchment sheets, on a baking sheet. Repeat with the second portion of dough, stacking it right on top of the first.
- Chill the dough: Chill the baking sheet with the rolled-out dough for 45 minutes, until the dough is firm. It can be left in the refrigerator for several days – if you are not going to be using it within a day, wrap the baking sheet in plastic wrap to keep the dough from drying out.
- Cut out the cookies: Preheat the oven to 350 degrees F. Use a 3-inch scalloped cookie cutter to cut hearts out of the chilled dough. Transfer the hearts to a parchment-covered baking sheet, then use a smaller scalloped cutter to cut hearts out of the center. Place the small hearts on a different baking sheet. It helps to keep the different shapes on separate sheets, since they might bake at different rates.
- Re-roll as needed: Combine the scraps and re-roll the dough to cut more cookies. You should get about 16-18 large heart cookies and a similar number of smaller ones. If at any time the dough becomes too soft and sticky to easily work with, refrigerate it briefly until it firms up again.
- Freeze the cookies: Put the sheets of cut-out cookies in the freezer for 10 minutes before baking to help the cookies hold their shape. This is optional, but helpful if your cookies are a more intricate shape.
- Bake the cookies: Bake the trays of cookies for 8-10 minutes, until the edges are just starting to take on color and they have lost the raw shine in the middle. Let them cool on the baking sheet for 5 minutes, then remove them to wire racks to cool completely before decorating them.
- Beat the butter: Beat the butter with an electric mixer fitted with a paddle attachment on medium speed for about 2 minutes, until creamy and light in color. Don’t skip this step, it gives your frosting a smooth and creamy texture, and prevents it from being overly yellow.
- Add vanilla and salt: Turn the mixer to medium-low, add the vanilla and salt, and mix until incorporated.
- Add partial sugar and milk: With the mixer running on low, gradually add half of the powdered sugar. Once it’s mostly incorporated, add the milk and mix it in.
- Add remaining sugar: Add the second half of the sugar, and once it’s mostly mixed, stop the mixer and scrape down the bottom and sides of the bowl. Mix once more on medium speed until light and creamy.
- Adjust the texture: If the frosting is too stiff for your liking, you can add a little more milk a bit at a time, until you get a texture you like. If it is too soft, add a few spoonfuls of powdered sugar to adjust the texture. A stiffer texture is better, so the piped decorations hold their shape well.
- Color the frosting: Decide how many colors you want to have, and divide the frosting into that many separate bowls. Keep a piece of cling wrap pressed on top of any frosting you’re not working with, so it won’t crust over. Add gel food coloring to each bowl and mix well.
- Storage: If you are not using this frosting right away, store in an airtight container and press a layer of plastic wrap directly on top of the frosting to avoid the frosting crusting. Store at room temperature for 1-2 days, in the refrigerator for up to a week, or in the freezer for up to 3 months. To use after storage, allow the frosting to come to room temperature, then mix it again before using to restore its creamy texture.
- Fill piping bags: Fit piping bags with small star tips. Fill each bag with buttercream and snip off the tip so they’re ready to go.
- Pipe stars: Start with one color, and pipe 4 or 5 small stars or rosettes around a cookie, leaving space in between for other colors. Repeat with 2 more cookies. This frosting crusts quickly, so if you’re adding sprinkles on top, you’ll only want to decorate about 3 cookies at a time, or else the sprinkles won’t stick.
- Add other colors: Use a different color and pipe a different size/shape around the cookie, spacing them out like you did before. Repeat with the rest of the frosting colors, until the cookie is covered with small stars and flowers. These cookies look best when you use a variety of tips, shapes, and sizes.
- Add sprinkles: As soon as the frosting is done, add your sprinkles on top. For large sprinkles, press them in gently to adhere them to the buttercream.
- Repeat: Repeat the process until all of your cookies are decorated.
Notes
- Use room temperature ingredients for best results.
- Chilling the dough is crucial for cut-out shapes.
- For vibrant colors, use gel food coloring.
- Store decorated cookies in a cool place to maintain frosting texture.
- Prep Time: 60 minutes
- Cook Time: 15 minutes
- Category: Dessert
- Method: Baking
- Cuisine: American
Nutrition
- Serving Size: 1 cookie
- Calories: 296
- Sugar: 22 g
- Sodium: 150 mg
- Fat: 12 g
- Saturated Fat: 7 g
- Unsaturated Fat: 3 g
- Trans Fat: 0 g
- Carbohydrates: 45 g
- Fiber: 1 g
- Protein: 2 g
- Cholesterol: 30 mg
Keywords: Buttercream Sugar Cookies, Sugar Cookies, Frosted Cookies