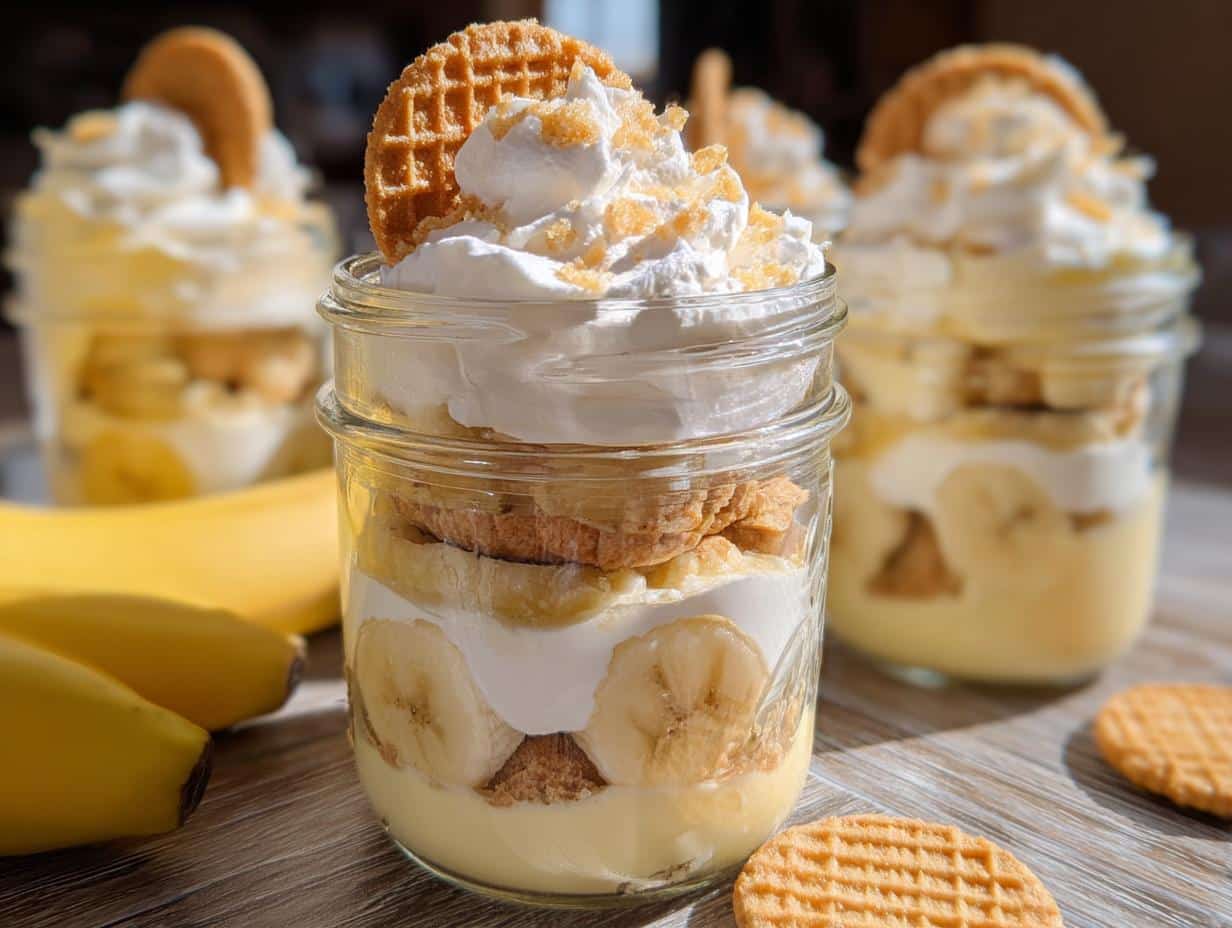
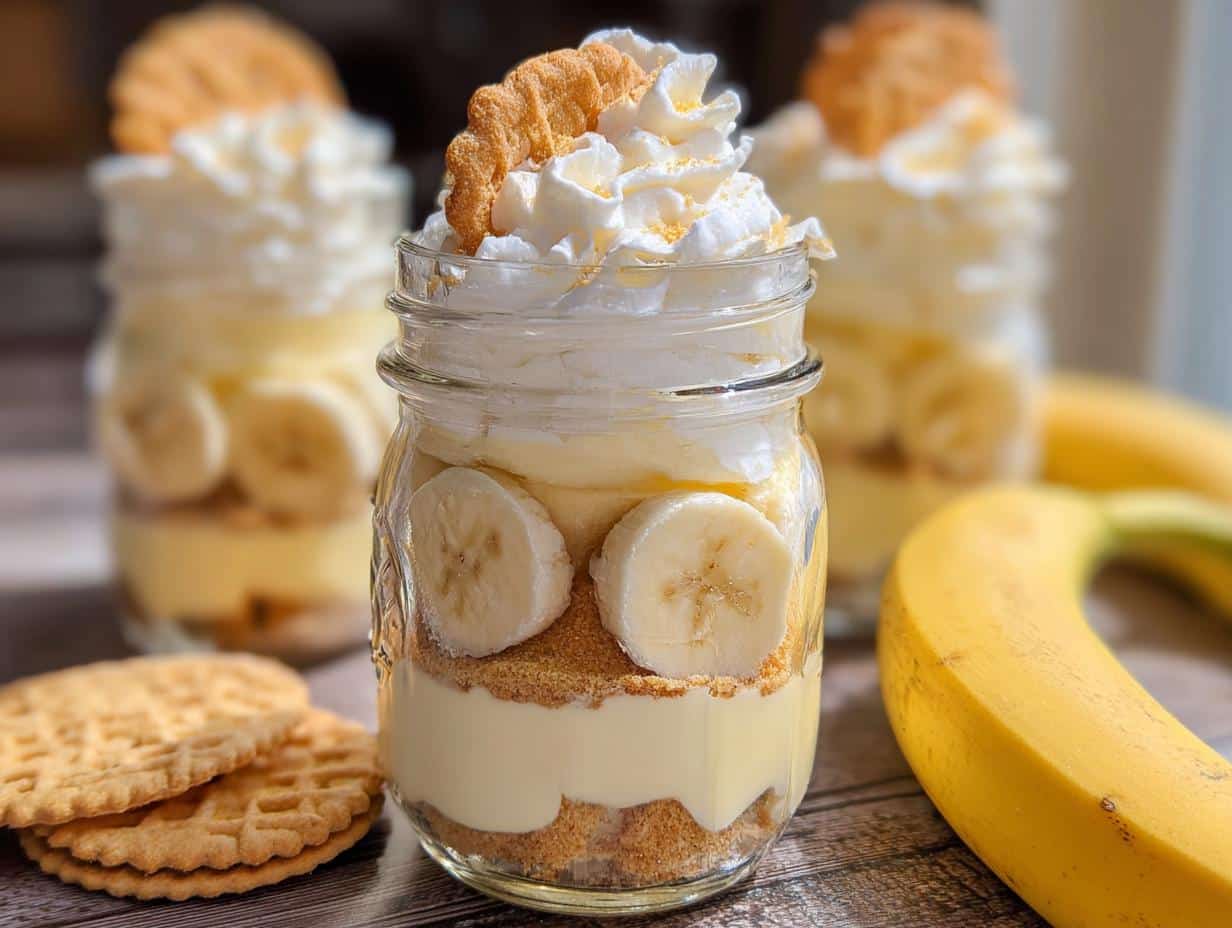
Banana pudding jars have become my absolute favorite way to enjoy this classic dessert. There’s something so wonderfully charming about perfectly layered, individual portions of creamy vanilla pudding, sweet banana slices, and crunchy vanilla wafers, all nestled neatly into a jar. I remember the first time I saw these delightful little creations at a summer picnic; they were so pretty and convenient! Learning how to make banana pudding jars at home felt like unlocking a delicious secret. The satisfying crunch of the wafers, the smooth, cool pudding, and the sweet kiss of fresh banana create a symphony of textures and flavors that always brings a smile to my face. These little dessert jars with banana pudding are not just beautiful; they’re a taste of pure comfort. Let’s get cooking!
Why You’ll Love These Banana Pudding Jars
- The taste is pure comfort: creamy pudding, sweet bananas, and crunchy wafers are a dream team.
- Super quick prep time means you can whip these up even on busy weeknights.
- They’re a healthier-ish option as single serving banana pudding helps with portion control.
- Budget-friendly ingredients make this a sweet treat that won’t break the bank.
- The kids absolutely adore them, making them a guaranteed family-pleaser.
- They’re incredibly convenient, offering portable banana pudding servings for picnics or packed lunches.
- The layering looks so elegant, making them perfect for any gathering or potluck.
- You can customize them with your favorite toppings for a personal touch.
Ingredients for Layered Banana Pudding Jars
Gathering these simple ingredients is the first step to creating beautiful creamy banana pudding containers. The magic happens with the combination of textures and flavors that make these banana pudding jars so irresistible. You’ll need:
- 3/4 cup sugar – for the perfect sweetness in our pudding
- 1/3 cup all-purpose flour – this acts as our thickening agent
- 3 cups whole milk – the base for our creamy pudding
- 4 egg yolks, beaten – adds richness and helps create that velvety texture
- 3 tablespoons butter – for a smooth, luxurious finish
- 2 ounces cream cheese – this is my secret for extra creaminess!
- 2 teaspoons vanilla extract – essential for that classic banana pudding flavor
- 1 cup heavy whipping cream – to whip up a light, airy topping
- 1 teaspoon sugar – to sweeten the whipped cream
- 48 vanilla wafers – the essential crunchy layer; roughly crush about half
- 2 large bananas – ripe but still firm, sliced for layering
How to Make Banana Pudding Jars
Creating these delightful banana pudding jars is a rewarding process that starts with a rich, homemade vanilla pudding. Get ready for your kitchen to smell amazing!
- Step 1: Make the Vanilla Pudding. In a medium saucepan, whisk together 3/4 cup sugar and 1/3 cup all-purpose flour. Gradually whisk in 3 cups whole milk. Cook this mixture over medium heat, stirring constantly, until it thickens and begins to bubble. Let it cook and stir for an additional 2 minutes. Remove the pan from the heat. In a separate small bowl, lightly beat the 4 egg yolks. Temper the yolks by slowly whisking about 1 cup of the hot pudding mixture into them. Then, pour the tempered yolk mixture back into the saucepan, stirring constantly. Return the pan to medium-low heat and cook, stirring, until the pudding begins to bubble again. Stir in 3 tablespoons butter, 2 ounces cream cheese, and 2 teaspoons vanilla extract until everything is smooth and well combined. Transfer the pudding to a clean bowl, press plastic wrap directly onto the surface to prevent a skin from forming, and chill in the refrigerator until completely set, at least 2 hours. This pudding is the heart of your banana pudding in a jar.
- Step 2: Whip the Cream. While the pudding chills, pour 1 cup heavy whipping cream into a clean, chilled bowl. Add 1 teaspoon sugar. Using an electric mixer or a whisk, beat the cream until stiff peaks form. Be careful not to over-whip it. Keep the whipped cream chilled until you’re ready to assemble your homemade banana pudding jars recipe.
- Step 3: Assemble the Banana Pudding Jars. Now for the fun part – assembling these beautiful layers! Take about half of your 48 vanilla wafers and roughly crush them into coarse crumbs. Divide these crumbs evenly among 6 small mason jars, creating the bottom layer for each jar. Next, slice your 2 large bananas and arrange 4-5 slices on top of the wafer crumbs in each jar. Spoon a generous amount of the chilled vanilla pudding over the banana slices. Repeat the layering process: add more crushed vanilla wafers, then banana slices, and finally, more pudding, continuing until the jars are almost full. Top each of your finished banana pudding creations with a dollop of the whipped cream. For that perfect finishing touch, garnish with a few extra banana slices, a whole wafer, or a sprinkle of wafer crumbs.
Pro Tips for the Best Banana Pudding Dessert Jars
I’ve learned a few tricks over the years to make these banana pudding jars truly spectacular. Following these simple tips will elevate your dessert game!
- For the absolute best banana pudding jars, make sure your pudding is completely chilled before assembling. This prevents the layers from getting soggy too quickly.
- Use bananas that are ripe but still firm. Overly soft bananas can turn mushy and brown faster in your mini banana pudding jars.
- Lightly toasting your vanilla wafers before crushing can add an extra layer of flavor and a more satisfying crunch.
- Don’t overfill the jars! Leave a little room at the top for the whipped cream garnish.
What’s the secret to perfect banana pudding jars?
The real secret to truly perfect banana pudding jars lies in the pudding itself. Making a homemade custard base with egg yolks, milk, and a touch of cream cheese creates an unparalleled creamy texture that store-bought versions just can’t match. For more dessert inspiration, check out these cosmic brownie bites.
Can I make individual banana pudding cups ahead of time?
Yes, you absolutely can prepare your individual banana pudding cups a day in advance. Assemble everything except the fresh banana slices and whipped cream. Add those just before serving to keep everything looking and tasting its freshest. You might also enjoy these nutter butter bars.
How do I avoid common mistakes with mini banana pudding jars?
A common pitfall is using bananas that are too ripe, leading to mushiness. Also, avoid assembling too far in advance without separating the wafers from the pudding, as they can become soggy. Add fresh bananas and cream just before serving for the best results. Learn more about proper food storage from the FDA.
Best Ways to Serve Banana Pudding Parfait Jars
These delightful banana pudding parfait jars are perfect for any occasion, from casual get-togethers to more elegant events. They’re so versatile! For a charming picnic, simply pack them in a cooler; they’re a wonderful grab-and-go option. For parties, arrange them on a tiered stand for a beautiful dessert display. These sweet banana pudding jars pair wonderfully with a light, refreshing beverage like iced tea or a sparkling lemonade. You could even serve them alongside some fresh fruit salad for a complete dessert spread that everyone will adore. Consider trying our apple salad recipes for a refreshing side.
Nutrition Facts for Banana Pudding Jars
When I make these delightful banana pudding jars, I love knowing what I’m serving. Here’s a breakdown of the estimated nutritional information per serving, so you can enjoy this classic dessert guilt-free.
- Calories: 340
- Fat: 18g
- Saturated Fat: 12g
- Protein: 5g
- Carbohydrates: 40g
- Fiber: 2g
- Sugar: 30g
- Sodium: 150mg
Nutritional values are estimates and may vary based on specific ingredients used in your homemade banana pudding jars recipe.
How to Store and Reheat Banana Pudding To Go Jars
Properly storing your banana pudding to go jars is key to keeping them fresh and delicious. Once your dessert jars with banana pudding have cooled completely, transfer them to their final mason jars or airtight containers. They’ll stay wonderfully creamy in the refrigerator for about 3 to 4 days. If you need to preserve them for longer, these jars also freeze beautifully for up to 3 months! Just be sure to thaw them overnight in the fridge before you plan to enjoy them. While these individual banana pudding cups are best enjoyed cold, if you prefer a slightly warmer pudding, you can gently reheat them in short bursts in the microwave, stirring in between, until just warm. However, I find they are absolutely perfect served chilled, just as intended! For another creamy dessert option, try our classic vanilla ice cream recipe.
Frequently Asked Questions About Banana Pudding Jar Recipes
Why are banana pudding jars so popular?
These banana pudding jars are popular because they offer a delightful combination of convenience, aesthetics, and delicious flavor. The individual servings make them perfect for portion control and easy transport, while the layered presentation is incredibly appealing. They’re a charming way to serve a beloved classic dessert, making them a hit at parties and gatherings. Plus, the nostalgia factor of banana pudding just adds to their charm!
Can I use pre-made pudding for my banana pudding jars?
While you can certainly use pre-made pudding to save time when making your banana pudding dessert jars, I highly recommend making it from scratch. The homemade version has a richer, creamier texture and a more authentic flavor that truly elevates these mini banana pudding jars. You’ll taste the difference, trust me!
How do I prevent bananas from browning in my layered banana pudding jars?
To keep your banana slices looking fresh in your layered banana pudding jars, the key is to add them just before serving. If you do need to assemble slightly ahead, toss the banana slices with a little lemon juice or pineapple juice before layering them. This acidic coating helps slow down the browning process, ensuring your individual banana pudding cups look as good as they taste. You can find more tips on fruit preservation on sites like FoodSafety.gov.
What are the best jars to use for banana pudding parfait jars?
For banana pudding parfait jars, small mason jars, typically 4-8 ounce sizes, work wonderfully. You can also use small glass canning jars, jelly jars, or even clear plastic cups if you’re serving a large crowd or for a more casual vibe. The important thing is that they’re clean, food-safe, and allow you to see those beautiful layers of your sweet banana pudding jars. Explore more last recipes for more ideas.
Variations of Banana Pudding in a Jar You Can Try
While this classic recipe for banana pudding jars is fantastic, I love experimenting with different twists! These variations can add new dimensions to your banana pudding dessert jars, catering to different tastes and dietary needs. For a dairy-free option, you can easily swap the whole milk for coconut milk and use a dairy-free cream cheese alternative. If you’re looking for a gluten-free treat, simply substitute gluten-free vanilla wafers or even crushed gluten-free cookies. For a richer flavor, try adding a tablespoon of rum or a hint of cinnamon to the pudding mixture. You could also experiment with different toppings like toasted pecans or a sprinkle of caramel sauce to make your mini banana pudding jars truly unique. Consider trying our churro saltine toffee recipe for another sweet treat.
Print
Banana Pudding Jars: A Glorious Treat
- Total Time: 1 hour 35 minutes
- Yield: 6 servings 1x
- Diet: Vegetarian
Description
Enjoy homemade banana pudding layered in individual jars with creamy vanilla pudding, fresh bananas, and crunchy vanilla wafers. This make-ahead dessert is perfect for parties or a sweet treat.
Ingredients
- 3/4 cup sugar
- 1/3 cup all-purpose flour
- 3 cups whole milk
- 4 egg yolks beaten
- 3 tablespoons butter
- 2 ounces cream cheese
- 2 teaspoons vanilla extract
- 1 cup heavy whipping cream
- 1 teaspoon sugar
- 48 vanilla wafers
- 2 large bananas
Instructions
- Make the Vanilla Pudding: In a saucepan, combine sugar, flour, and milk. Cook over medium heat, stirring, until thick and bubbly. Continue cooking and stirring for 2 more minutes. Remove from heat. Beat egg yolks in a small bowl. Slowly whisk in 1 cup of hot pudding to temper. Return the egg mixture to the pan, stirring constantly. Cook until it begins to bubble again. Stir in butter, cream cheese, and vanilla until smooth. Transfer to a bowl, cover with plastic wrap touching the surface, and chill until set.
- Whip the Cream: In a clean bowl, pour 1 cup of heavy cream and add 1 teaspoon of sugar. Using a hand mixer or whisk, beat until stiff peaks form. Chill until ready to use.
- Assemble the Banana Pudding Jars: Roughly crush half of the vanilla wafers and divide them among 6 small mason jars as the bottom layer. Slice your bananas and add 4-5 slices to each jar over the wafers. Spoon a few tablespoons of the chilled pudding over the bananas. Repeat the layers—crushed vanilla wafers, banana slices, pudding—until jars are nearly full. Top each banana pudding jar with a dollop of whipped cream. Garnish with extra banana slices, a whole wafer, or some wafer crumbs for texture and charm.
Notes
- Use firm, ripe bananas for best texture in your banana pudding jars.
- If prepping banana pudding jars ahead, add bananas right before serving to avoid browning.
- For extra flavor in your banana pudding jars, lightly toast the wafers before layering.
- Chill the assembled banana pudding jars for at least 2 hours before serving.
- Prep Time: 25 minutes
- Cook Time: 10 minutes
- Category: Dessert
- Method: Layering
- Cuisine: American
Nutrition
- Serving Size: 1 jar
- Calories: 340
Keywords: Banana Pudding Jars, Banana pudding in a jar, Individual banana pudding cups, Single serving banana pudding, Banana pudding dessert jars, Creamy banana pudding containers, Homemade banana pudding jars recipe, Best banana pudding jars, How to make banana pudding jars, Mini banana pudding jars, Layered banana pudding jars, Banana pudding parfait jars, Dessert jars with banana pudding, Sweet banana pudding jars, Banana pudding jar recipes, Portable banana pudding servings

