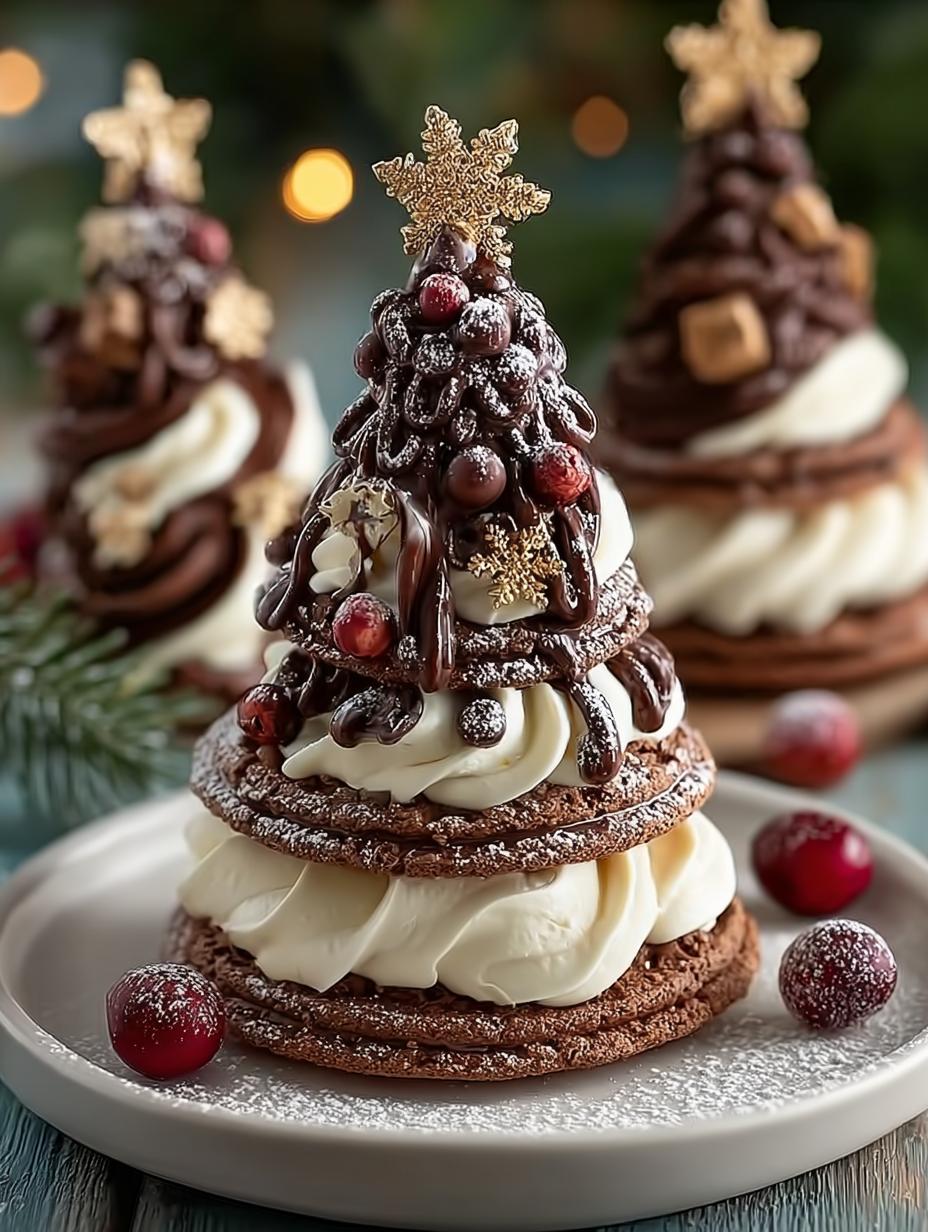
Christmas Chocolate Trees are the perfect festive treat to bring holiday cheer into your home. These delightful edible creations are not only visually stunning but also incredibly fun to make, especially with family and friends. Whether you’re hosting a holiday party or looking for a fun activity with the kids, crafting these delicious trees will spark joy and creativity. Let’s dive into the magic of making these enchanting treats!
Why You’ll Love This Christmas Chocolate Trees
There are countless reasons to adore these festive chocolate trees. First, they are visually appealing, adding a beautiful touch to your holiday dessert table. Second, they are simple and quick, making them perfect for last-minute gatherings. Third, you can customize them with various toppings—think holiday sprinkles, crushed peppermint, or even mini candy pearls. Fourth, they are a fantastic way to involve kids in the kitchen, creating memorable bonding moments. Fifth, they make great gifts or party favors, wrapping them in clear bags tied with festive ribbons. Lastly, these chocolate Christmas trees are a sweet way to celebrate the season, embodying the spirit of Christmas in every bite.

Ingredients for Christmas Chocolate Trees
Gather these items:
- 1 ½ cups semi-sweet chocolate chips
- 1 cup white chocolate chips
- 1 tablespoon vegetable oil (optional, for smoother melting)
- Holiday sprinkles
- Mini candy pearls
- Snowflake sprinkles
- Red and green sanding sugar
- Crushed peppermint candy
- Gold sugar stars
- Pretzel sticks or pretzel rods
How to Make Christmas Chocolate Trees Step-by-Step
- Step 1: Line a baking sheet with parchment paper or a silicone baking mat. For uniform trees, lightly sketch tree shapes on the underside of the parchment as a guide.
- Step 2: Place semi-sweet chocolate chips in a microwave-safe bowl. Heat in 20-second intervals, stirring between each, until smooth. Add a small amount of vegetable oil if desired for a silkier texture. Repeat in a separate bowl with the white chocolate if you plan to use both.
- Step 3: Spoon the melted chocolate into a piping bag or a zip-top bag. Snip a tiny opening at one corner for controlled piping.
- Step 4: Pipe a straight vertical line as the “trunk” guide. Then pipe zigzag lines back and forth across the vertical line, starting narrow at the top and widening toward the base to create a tree shape. If using pretzel sticks, pipe the tree directly over the top portion of each pretzel to secure it.
- Step 5: While the chocolate is still wet, sprinkle on holiday sprinkles, candy pearls, sanding sugar, snowflake sprinkles, crushed peppermint, or gold sugar stars. Decorate as simply or as creatively as you like.
- Step 6: Place the baking sheet in the refrigerator for 10–15 minutes, or until the chocolate trees are completely firm.
- Step 7: Gently lift the chocolate trees off the parchment using your fingers or a thin spatula. Use them to decorate cakes, cupcakes, cookie trays, hot cocoa boards, or enjoy as edible Christmas tree treats.

Pro Tips for the Best Christmas Chocolate Trees
Keep these in mind:
- Use high-quality chocolate for richer flavor.
- Make sure to secure the pretzel sticks well when piping the chocolate.
- Experiment with various toppings for unique looks and flavors.
- Try using colored chocolate melts for a vibrant twist.
Best Ways to Serve Christmas Chocolate Trees
These delightful treats can be served in a variety of ways. You can display them on a festive platter, use them as cake or cupcake toppers, or even place them on hot cocoa boards. They also make great additions to cookie trays during holiday parties, showcasing your creativity alongside traditional cookies.
How to Store and Reheat Christmas Chocolate Trees
To keep your chocolate trees fresh, store them in an airtight container in a cool place or the refrigerator if your climate is warm. They should last for about a week. To serve, simply take them out and enjoy; there’s no need to reheat.
Frequently Asked Questions About Christmas Chocolate Trees
What’s the secret to perfect Christmas Chocolate Trees?
The secret lies in the melting process and ensuring the chocolate is smooth. Also, using a piping bag helps create precise tree shapes, making them look professional. Experimenting with different toppings can also elevate your design!
Can I make Christmas Chocolate Trees ahead of time?
Absolutely! These trees can be made a few days in advance. Just store them in an airtight container to keep them fresh until you are ready to serve.
How do I avoid common mistakes with Christmas Chocolate Trees?
To avoid common pitfalls, make sure the chocolate melts thoroughly without burning. Additionally, ensure your piping bag has a small enough opening for detailed designs, and don’t rush the cooling process!
Variations of Christmas Chocolate Trees You Can Try
Feel free to get creative! Consider using dark chocolate instead of semi-sweet for a richer flavor. You can also try incorporating different toppings like nuts or dried fruit for a unique twist. For a fun holiday theme, use colored chocolate melts to create different colored trees!
For more festive ideas, check out our latest recipes or try making Cosmic Brownie Bites for a sweet treat!
Additionally, if you’re interested in the science behind chocolate melting, you can read more about it here.
Print
Christmas Chocolate Trees: 12 Festive Treats to Make Now
- Total Time: 25 minutes
- Yield: 12-15 chocolate trees 1x
- Diet: Vegetarian
Description
Festive & Fun Christmas Chocolate Trees Recipe for Holiday Magic
Ingredients
- 1 ½ cups semi-sweet chocolate chips
- 1 cup white chocolate chips
- 1 tablespoon vegetable oil (optional, for smoother melting)
- Holiday sprinkles
- Mini candy pearls
- Snowflake sprinkles
- Red and green sanding sugar
- Crushed peppermint candy
- Gold sugar stars
- Pretzel sticks or pretzel rods
Instructions
- Line a baking sheet with parchment paper or a silicone baking mat. For uniform trees, lightly sketch tree shapes on the underside of the parchment as a guide.
- Place semi-sweet chocolate chips in a microwave-safe bowl. Heat in 20-second intervals, stirring between each, until smooth. Add a small amount of vegetable oil if desired for a silkier texture. Repeat in a separate bowl with the white chocolate if you plan to use both.
- Spoon the melted chocolate into a piping bag or a zip-top bag. Snip a tiny opening at one corner for controlled piping.
- Pipe a straight vertical line as the “trunk” guide. Then pipe zigzag lines back and forth across the vertical line, starting narrow at the top and widening toward the base to create a tree shape. If using pretzel sticks, pipe the tree directly over the top portion of each pretzel to secure it.
- While the chocolate is still wet, sprinkle on holiday sprinkles, candy pearls, sanding sugar, snowflake sprinkles, crushed peppermint, or gold sugar stars. Decorate as simply or as creatively as you like.
- Place the baking sheet in the refrigerator for 10–15 minutes, or until the chocolate trees are completely firm.
- Gently lift the chocolate trees off the parchment using your fingers or a thin spatula. Use them to decorate cakes, cupcakes, cookie trays, hot cocoa boards, or enjoy as festive stand-alone treats.
Notes
- Prep Time: 20 minutes
- Cook Time: 5 minutes
- Category: Dessert
- Method: No-bake
- Cuisine: American
Nutrition
- Serving Size: 1 tree
- Calories: 150
- Sugar: 12g
- Sodium: 5mg
- Fat: 9g
- Saturated Fat: 5g
- Unsaturated Fat: 4g
- Trans Fat: 0g
- Carbohydrates: 15g
- Fiber: 1g
- Protein: 2g
- Cholesterol: 0mg
Keywords: Christmas Chocolate Trees, Holiday Treats, Chocolate Recipes