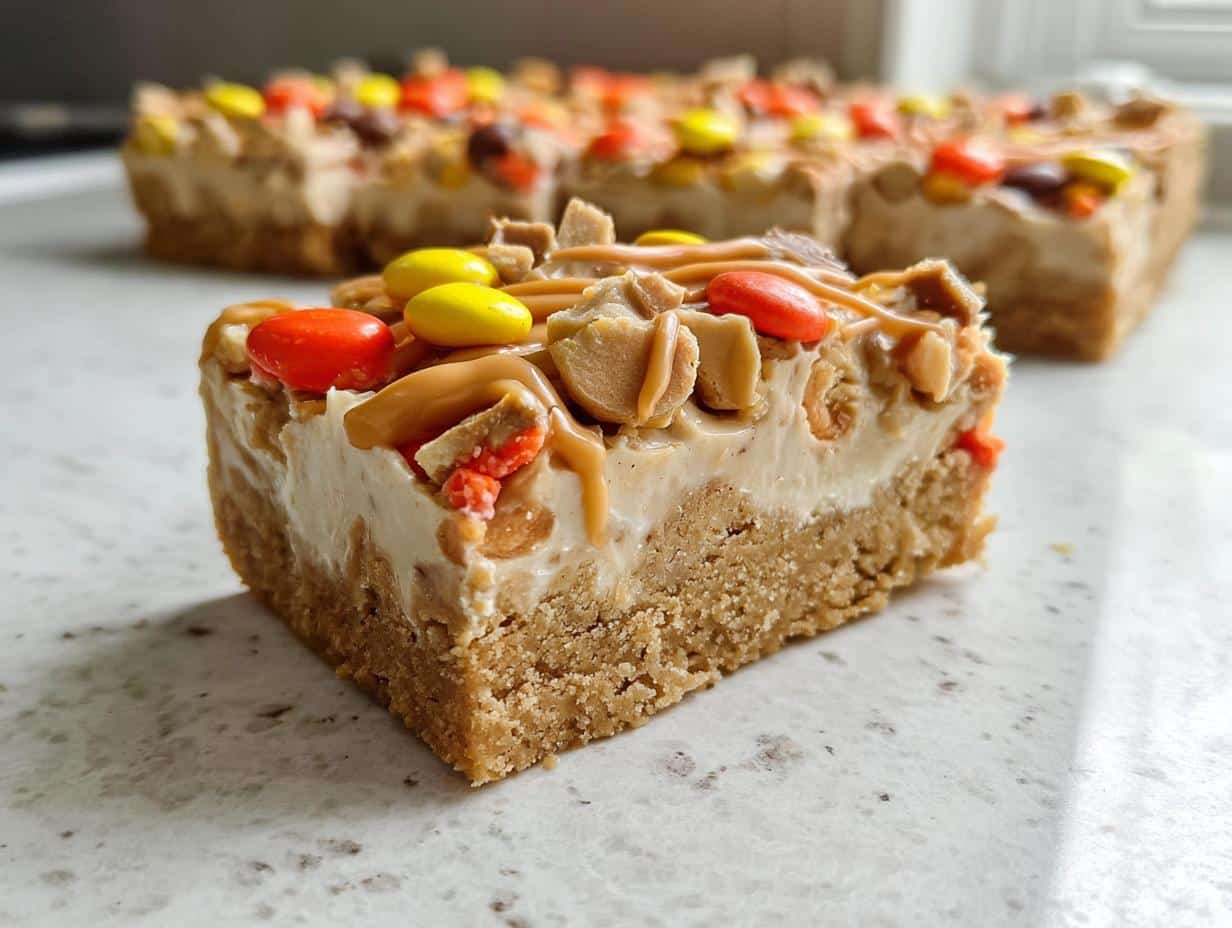
Nutter Butter Bars have been a family favorite in my house ever since I first stumbled upon this recipe. I remember my grandma making something similar, a no-bake treat that always disappeared in minutes. The creamy peanut butter, the satisfying crunch of the cookies, and that perfect balance of sweet and salty truly make these Nutter Butter dessert bars an irresistible indulgence. I’ve discovered that these easy, no-bake peanut butter treats are perfect for parties, potlucks, or just a cozy night in. Let’s get cooking!
Why You’ll Love These Nutter Butter Bars
I promise you, these Nutter Butter Bars are about to become your new favorite dessert. I adore them for so many reasons, and I know you will too.
- They’re incredibly delicious, with a perfect blend of sweet and salty peanut butter flavor.
- This is an easy Nutter Butter bar recipe that requires minimal effort and no complicated steps.
- You can whip up these no-bake treats in no time, making them ideal for last-minute gatherings.
- They are super budget-friendly, using readily available ingredients you probably already have.
- Kids and adults alike absolutely adore these bars, making them a fantastic family-friendly dessert.
- This easy Nutter Butter bar recipe is versatile, allowing for fun additions and variations.

Ingredients for Nutter Butter Bars
Gathering your ingredients is the first step to these amazing Nutter Butter Bars! You don’t need anything fancy, just a few simple items to create these delightful peanut butter wafer bars. I love how accessible these ingredients are, making this recipe a go-to for any occasion.
- 32 Nutter Butter cookies (approximately 4 cups crumbs) – for the delicious base; these are the star of our show!
- 1/2 cup melted butter – to bind the crust together, giving it that perfect texture.
- 2 tablespoons brown sugar – adds a touch of sweetness and depth to the crust.
- 1/4 teaspoon salt – a pinch enhances all the flavors, balancing the sweetness.
- 1 can sweetened condensed milk (14 oz.) – this creates the creamy, rich filling for these peanut butter wafer bars.
- 1/4 cup creamy peanut butter – for an extra punch of peanut butter flavor in the filling.
- 1 cup peanut butter chips – more peanut butter goodness mixed into the bars.
- 1/2 cup roasted peanuts – for a satisfying crunch and nutty flavor.
- 12 Nutter Butter cookies (chopped) – for topping, adding texture and more Nutter Butter flavor.
- 3/4 cup Reeses Pieces candy – because who doesn’t love the chocolate and peanut butter combination?
- flaky sea salt, optional – a sprinkle at the end really makes the flavors pop.
- 2 tablespoons creamy peanut butter (for drizzling) – for that beautiful finishing touch and extra flavor.
How to Make Nutter Butter Bars
Making these delightful Nutter Butter Bars is incredibly straightforward, even for a beginner. I’ll walk you through each step to ensure your homemade Nutter Butter squares turn out perfectly gooey and delicious. Get ready to impress everyone with these simple yet show-stopping treats!
- Step 1: First, preheat your oven to 350°F (175°C). This ensures it’s ready to go when your bars are assembled. Next, line a 9×13 inch pan with parchment paper, leaving an overhang on the sides. This makes lifting the finished homemade Nutter Butter squares out so much easier.
- Step 2: Now, let’s make the crust. Take 32 Nutter Butter cookies and crush them into fine crumbs. I usually use my food processor for this, but a blender or even a Ziploc bag and a rolling pin work great. You’ll need about 4 cups of crumbs. In a large bowl, combine these cookie crumbs with the brown sugar and salt, then pour in the melted butter and stir until everything is well combined. It should look like wet sand.
- Step 3: Press the Nutter Butter crust mixture firmly into the bottom of your prepared pan. I like to use the bottom of a glass or a flat-bottomed measuring cup to get an even, compact layer. This firm base is crucial for your Nutter Butter Bars to hold together beautifully.
- Step 4: Time for the creamy filling! In a medium microwave-safe bowl, melt the 1/4 cup of creamy peanut butter for about 30 seconds. Once melted, stir in the entire can of sweetened condensed milk until it’s smooth and fully combined. The aroma of peanut butter will start to fill your kitchen at this point, which is always a good sign!
- Step 5: Assemble your bars. Sprinkle the peanut butter chips and roasted peanuts evenly over the prepared Nutter Butter crust. Then, carefully pour the peanut butter condensed milk mixture on top, spreading it gently to cover all the toppings.
- Step 6: Finally, sprinkle the chopped Nutter Butter cookies and Reese’s Pieces candy over the top. Use a spatula or fork to gently press these toppings into the condensed milk mixture so they stick. If you like a little extra flavor pop, now’s the time to sprinkle with flaky sea salt. These homemade Nutter Butter squares are almost ready for the oven!
- Step 7: Bake for 30 to 35 minutes, or until the edges are golden brown and the center is set. When they come out, the house will smell incredible! Place the pan on a wire rack to cool completely before chilling them in the refrigerator for at least 2-3 hours. Chilling helps them firm up for perfect slicing.
- Step 8: To serve, melt the remaining 2 tablespoons of peanut butter and drizzle it over the chilled bars. Slice and enjoy your delicious Nutter Butter Bars!
Pro Tips for the Best Nutter Butter Bars
I’ve made these Nutter Butter Bars countless times, and I’ve picked up a few tricks along the way that guarantee perfect results every single time. These expert tips will elevate your homemade treats from good to absolutely phenomenal, ensuring every bite is a creamy, crunchy delight.
- Always use fresh ingredients, especially your Nutter Butter cookies, for the best flavor and texture.
- Ensure your crust is pressed down very firmly; this prevents it from crumbling when you slice the bars later.
- Don’t overbake! The bars should be set but still slightly soft in the center when removed from the oven.
- Chilling is non-negotiable! These bars need ample time in the refrigerator to firm up properly for clean slices.
- A sprinkle of flaky sea salt truly enhances the peanut butter flavor and balances the sweetness.

What’s the secret to perfect Nutter Butter Bar texture?
The key to perfect texture in your Nutter Butter Bars lies in two things: finely crushed cookies for the crust and thorough chilling. For these delightful Nutter Butter recipes no bake, ensuring the crust is compact and the filling is fully set creates that ideal balance of firm and creamy.
Can I make Nutter Butter Bars ahead of time?
Absolutely! These Nutter Butter Bars are fantastic for making ahead. I often prepare them the day before I plan to serve them. Just cover them tightly with plastic wrap once cooled and chilled, and store them in the refrigerator until you’re ready to slice and enjoy.
How do I avoid common mistakes with Nutter Butter Bars?
To avoid common mistakes with your Nutter Butter Bars, make sure your cookie crumbs are fine and the crust is pressed very firmly to prevent crumbling. Also, don’t rush the chilling process; adequate chilling ensures clean, beautiful slices. Overbaking can lead to a dry texture, so keep an eye on them!
Best Ways to Serve Nutter Butter Bars
Once your delicious Nutter Butter Bars are perfectly chilled and ready, it’s time to enjoy them! I find these bars are incredibly versatile and can be served in a few delightful ways, making them perfect for any occasion. They’re already a complete dessert on their own, but a few additions can truly elevate the experience.
For a simple, satisfying treat, just slice and serve them as is. The rich peanut butter flavor and satisfying textures are pure perfection. If you’re looking for fantastic Nutter Butter dessert ideas, try pairing a square with a scoop of vanilla bean ice cream. The cold, creamy ice cream melting into the bar is heavenly. Another great option is to serve them alongside a tall glass of cold milk or a hot cup of coffee for a cozy snack. These bars are also a fantastic addition to any dessert platter for parties or potlucks.
Nutrition Facts for Nutter Butter Bars
While I haven’t calculated the exact nutritional breakdown for these homemade Nutter Butter Bars, I can provide estimated values per serving to give you a general idea. Please remember that these are approximations and can vary based on the specific brands of ingredients you use.
- Serving Size: 1 bar
- Calories: Unknown
- Fat: Unknown
- Saturated Fat: Unknown
- Carbohydrates: Unknown
- Fiber: Unknown
- Sugar: Unknown
- Protein: Unknown
- Sodium: Unknown
Nutritional values are estimates and may vary based on specific ingredients used.
How to Store and Reheat Nutter Butter Bars
Once your irresistible Nutter Butter Bars have cooled completely and are perfectly chilled, proper storage is key to keeping them fresh and delicious. I always make sure to let them chill thoroughly in the refrigerator before I even think about storing them; this helps them set beautifully.
For short-term storage, transfer the sliced bars to an airtight container. They will stay fresh and amazing in the refrigerator for 3-4 days. For longer enjoyment of these delightful no-bake Nutter Butter treats, you can freeze them! Wrap individual bars tightly in plastic wrap, then place them in a freezer-safe bag or container. They will keep well in the freezer for up to 3 months.
To enjoy frozen no-bake Nutter Butter treats, simply let them thaw in the refrigerator overnight, or at room temperature for about 30 minutes. I find they’re just as good as fresh!
Frequently Asked Questions About Nutter Butter Bars
Can I make Nutter Butter Bars without baking?
While this particular recipe involves a short bake time for the crust and to set the filling, you absolutely can make some versions of Nutter Butter Bars completely no-bake. For a truly no-bake option, you could press the crust firmly and then just chill the bars until firm, omitting the oven step. However, I find the slight bake helps create the very best texture.
What’s the best way to cut Nutter Butter Bars cleanly?
The secret to cutting your Nutter Butter Bars cleanly is thorough chilling! Make sure they are completely firm before attempting to slice. I also recommend using a large, sharp knife and wiping it clean with a warm, damp cloth between each cut. This prevents sticking and ensures beautiful, neat squares every time from this best Nutter Butter bar recipe.
Can I add chocolate to my Nutter Butter Bars?
Yes, and I highly encourage it! This recipe already includes Reese’s Pieces for that perfect chocolate and peanut butter combo. You could also drizzle melted chocolate over the top once the bars are cooled, or even add chocolate chips to the filling mixture. Experimenting with chocolate is a fantastic way to customize your Nutter Butter Bars.
Why are my Nutter Butter Bars crumbling?
If your Nutter Butter Bars are crumbling, it’s likely due to the crust not being pressed firmly enough, or the bars not being chilled sufficiently. Ensure you really compact the crust mixture into the pan. Also, resist the urge to cut them before they’ve had ample time to set in the refrigerator – at least 2-3 hours, or even overnight, for the best Nutter Butter bar recipe results.
Variations of Nutter Butter Bars You Can Try
While my classic Nutter Butter Bars recipe is absolute perfection, I love experimenting in the kitchen! These bars are incredibly versatile, and it’s fun to explore different twists. Here are a few variations you can try to customize them to your liking, from dietary adjustments to exciting new flavor combinations.
- Chocolate Drizzle Delight: For the ultimate peanut butter and chocolate experience, melt some milk or dark chocolate and drizzle it generously over the cooled bars before serving. This adds an extra layer of decadence and visual appeal.
- Gluten-Free Version: You can easily adapt this recipe to be gluten-free by using gluten-free peanut butter sandwich cookies instead of traditional Nutter Butters. The texture will be very similar, allowing everyone to enjoy these delicious peanut butter cookie bars.
- No-Bake Option: If you prefer a completely no-bake treat, simply skip the baking step! Press the crust firmly, then pour and top the filling. Chill for at least 4-6 hours (or overnight) until completely set. These make fantastic peanut butter cookie bars without turning on the oven.
- Nutty Crunch Bars: Incorporate other chopped nuts like pecans or walnuts into the filling mixture for an added layer of texture and nutty flavor. You can also swap out the Reese’s Pieces for other candy, like chopped chocolate bars or M&M’s.

Nutter Butter Bars: 1 Mighty Trick for Perfect Slices
- Total Time: 70-75 minutes (plus chilling time)
- Yield: 24 servings 1x
- Diet: Vegetarian
Description
These Nutter Butter bars are a simple, no-bake dessert that features the classic peanut butter cookie in a new form. They combine crushed Nutter Butter cookies with melted butter for a crust, topped with a creamy peanut butter and sweetened condensed milk filling, and loaded with peanut butter chips, roasted peanuts, and Reese’s Pieces for a delightful treat.
Ingredients
- 32 Nutter Butter cookies (approximately 4 cups crumbs)
- 1/2 cup melted butter
- 2 tablespoons brown sugar
- 1/4 teaspoon salt
- 1 can sweetened condensed milk (14 oz.)
- 1/4 cup creamy peanut butter
- 1 cup peanut butter chips
- 1/2 cup roasted peanuts
- 12 Nutter Butter cookies (chopped)
- 3/4 cup Reeses Pieces candy
- flaky sea salt, optional
- 2 tablespoons creamy peanut butter (for drizzling)
Instructions
- Preheat oven to 350°F. Line a 9 x 13 inch pan with parchment paper.
- Make the Nutter Butter crust. Crush 32 Nutter Butter cookies into 4 cups of fine crumbs using a food processor, blender, or ziptop bag and rolling pin. Stir the cookie crumbs, brown sugar, and salt together in a large bowl. Add the melted butter and stir well. Use a glass or flat-bottomed measuring cup to press the crumbs into the prepared pan.
- Make the filling. Melt the peanut butter in a medium microwave-safe bowl for about 30 seconds. Stir in the sweetened condensed milk until combined.
- Assemble the Nutter Butter bars. Sprinkle the peanut butter chips and peanuts on top of the crust. Pour the peanut butter condensed milk mixture on top. Add the chopped Nutter Butters and Reese’s Pieces. Use a spatula or fork to gently press the toppings into the condensed milk mixture so everything adheres. If desired, sprinkle with flaky sea salt.
- Bake for 30 to 35 minutes or until the edges are golden brown. Place on a wire rack to cool. Chill in the refrigerator.
- To serve, melt 2 tablespoons of peanut butter in the microwave and drizzle on top of the bars. These homemade Nutter Butter squares are a fantastic dessert.
Notes
- Ensure Nutter Butter cookie crumbs are fine for a solid crust.
- Press the crust firmly into the pan to prevent crumbling.
- Chilling the Nutter Butter bars thoroughly makes them easier to slice.
- Flaky sea salt enhances the flavor of these peanut butter wafer bars.
- These Nutter Butter dessert bars are a great make-ahead option.
- Prep Time: 40 minutes
- Cook Time: 30-35 minutes
- Category: Dessert
- Method: Baking
- Cuisine: American
Nutrition
- Serving Size: 1 bar
- Calories: Unknown
- Sugar: Unknown
- Sodium: Unknown
- Fat: Unknown
- Saturated Fat: Unknown
- Unsaturated Fat: Unknown
- Trans Fat: Unknown
- Carbohydrates: Unknown
- Fiber: Unknown
- Protein: Unknown
- Cholesterol: Unknown
Keywords: Nutter Butter dessert bars, Peanut butter wafer bars, No-bake Nutter Butter treats, Easy Nutter Butter bar recipe, How to make Nutter Butter bars, Nutter Butter recipes no bake, Peanut butter cookie bars, Homemade Nutter Butter squares, Nutter Butter dessert ideas, Simple Nutter Butter treats, Best Nutter Butter bar recipe, Nutter Butter and chocolate bars, Creamy peanut butter bars