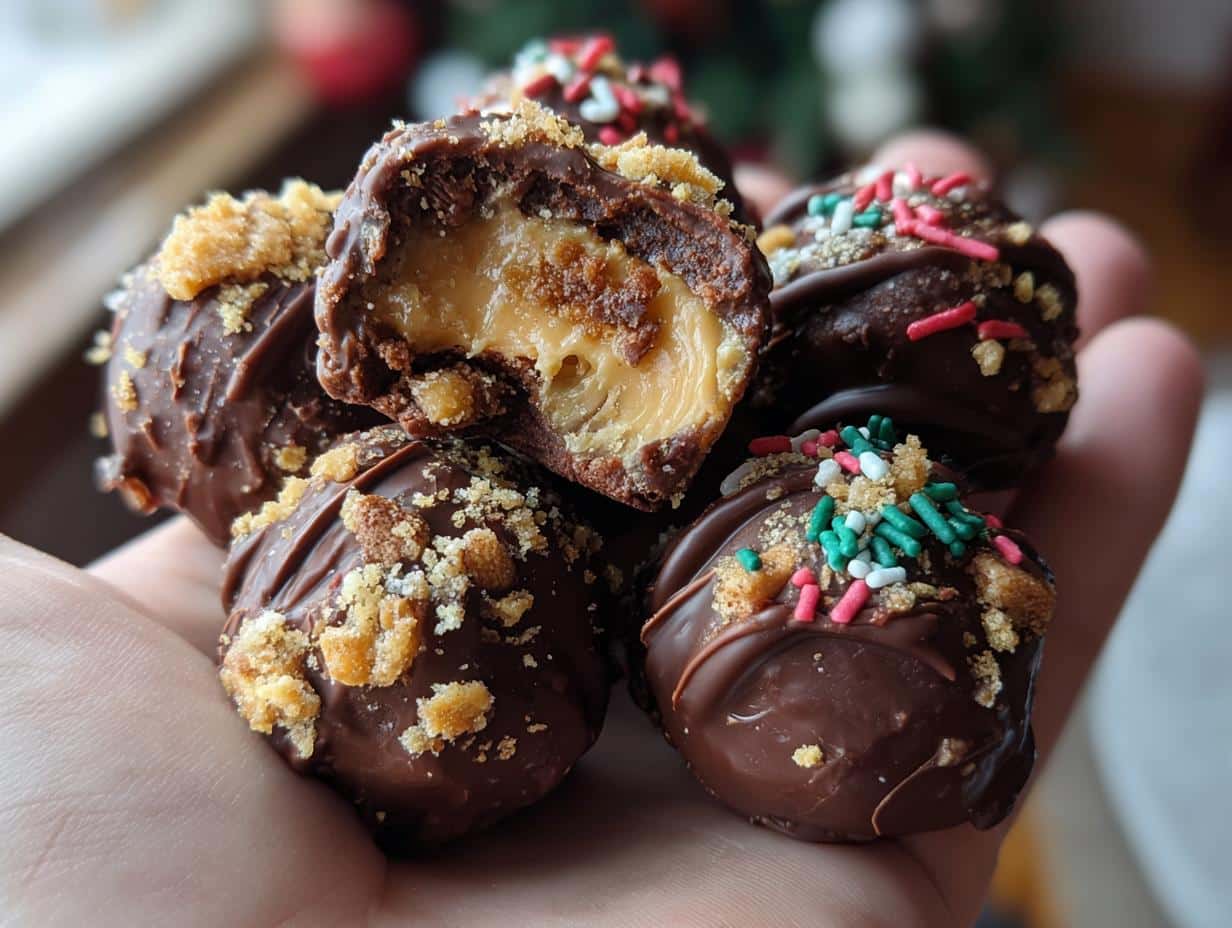
Oh, I just LOVE a good no-bake dessert, don’t you? There’s something so satisfying about whipping up a sweet treat without even turning on the oven. And these Butterfinger Balls? They’re seriously addictive! I first made these little guys for a holiday party a few years back, and let me tell you, they were GONE in minutes. I barely even got to try one! Ever since then, they’ve been a staple at every gathering.
Honestly, what’s not to love? They’re so easy to throw together, even the kids can help (which, let’s be real, is half the fun!). Plus, that perfect combo of peanut butter, chocolate, and crunchy Butterfinger? It’s a total crowd-pleaser. Trust me, if you’re looking for a fun, no-fuss dessert that everyone will rave about, these Butterfinger Balls are IT. They are sweet, decadent, and truly a bite of heaven!
Why You’ll Love This Butterfinger Balls Recipe
Quick and Easy Butterfinger Balls
Seriously, these Butterfinger Balls are a lifesaver when you need a dessert, like, *yesterday*. We’re talking minimal prep time, folks. Just a few simple steps, and you’re on your way to peanut butter-chocolate bliss!
No-Bake Butterfinger Balls
Hello, no oven required! That’s right, no need to sweat it out in a hot kitchen. These little gems are completely no-bake, making them absolutely perfect for those warm summer months (or, you know, any time you just don’t feel like turning on the darn oven!).
Perfect for Parties and Gifts
Need a crowd-pleaser for your next get-together? Look no further! Butterfinger Balls are always a hit. And they’re so cute, you can even package them up in little boxes for easy and delicious homemade gifts. Who wouldn’t love that?
Kid-Friendly Butterfinger Balls
Get the kiddos involved! This recipe is super kid-friendly. They’ll love helping you crush the Butterfinger bars (carefully, of course!) and rolling the dough into balls. It’s a fun activity *and* a tasty treat. Win-win!
Customizable Butterfinger Balls
Want to get a little creative? These Butterfinger Balls are totally customizable. I’ll show you how to swap ingredients and try different variations to make them your own. Think cream cheese, different chocolates… the possibilities are endless!
Ingredients for Your Butterfinger Balls
Alright, let’s gather our goodies! Here’s what you’ll need to make these amazing Butterfinger Balls. Don’t worry, it’s a short and sweet list!
- 4 tablespoons softened butter (that’s ½ a stick, and trust me, it needs to be SOFT. Leave it out for about an hour before you start, okay?)
- 1 teaspoon vanilla extract (the real stuff, please! It makes a difference)
- 8 ounces chocolate bark or chocolate chips (I usually go for semi-sweet, but milk chocolate works great too. Just grab your fave!)
- ½ cup Butterfinger bars, crushed (and I mean *really* crushed! You want small pieces, not big chunks)
- 1 cup powdered sugar (also known as confectioners’ sugar. Don’t use granulated sugar, it just won’t work!)
- 1 cup peanut butter (Now, this is important: avoid the all-natural kind. It tends to be too oily. Regular creamy peanut butter is what you want!)
- ¾ cup graham cracker crumbs (you can buy them already crushed, or just throw the graham crackers in a zip-top bag and crush them yourself. It’s kinda therapeutic!)
- Optional garnishes: additional crushed Butterfinger bars, festive sprinkles, or coarse sea salt (Okay, these are totally optional, but they make the Butterfinger Balls look extra fancy! I’m a sucker for a little sprinkle of sea salt – it balances the sweetness perfectly.)
How to Make Butterfinger Balls: Step-by-Step Instructions
Preparing the Butterfinger Balls Dough
Step 1: Combine Peanut Butter and Butter
Alright, first things first! Grab your mixing bowl and toss in that peanut butter and softened butter. Now, you’ll want to use an electric mixer (either a hand mixer or a stand mixer works great!) and beat them together on medium speed until they’re nice and creamy. Trust me, you don’t want any lumps here!
Step 2: Add Vanilla Extract
Okay, next up, pour in that vanilla extract. Just a teaspoon, but it makes a world of difference! Mix it in well, scraping down the sides of the bowl to make sure everything’s evenly combined.
Step 3: Sweeten with Powdered Sugar
Now comes the powdered sugar. This is where things can get a little messy, so turn that mixer to low! Add the powdered sugar gradually, mixing until it’s all incorporated. You might need to scrape down the sides of the bowl a few times to get everything mixed in properly. Don’t worry if it looks a little crumbly at this point, that’s totally normal!
Step 4: Add Crunch with Graham Crackers and Butterfinger
Time for the good stuff! Gently fold in those graham cracker crumbs and crushed Butterfinger bars. You don’t want to overmix here, just stir until everything is evenly distributed throughout the dough. And hey, feel free to sneak a little taste – I won’t tell!
Shaping and Chilling Your Butterfinger Balls
Step 5: Shape the Dough
Line a cookie sheet with parchment paper (this will prevent the Butterfinger Balls from sticking). Now, grab a spoon or a cookie scoop and scoop out about 1 to 1½ tablespoons of dough. Roll it into a nice, neat ball and place it on the prepared cookie sheet.

Step 6: Chilling Phase
This is a crucial step, so don’t skip it! Pop the cookie sheet into the freezer and let those Butterfinger Balls chill for at least 30 minutes, or until they’re firm. This will make them much easier to coat in chocolate later on. Trust me, you don’t want melty, messy Butterfinger Balls!
Coating and Decorating Your Butterfinger Balls
Step 7: Melting the Chocolate
Once those Butterfinger Balls are nice and firm, it’s time to melt the chocolate. Place the chocolate bark or chocolate chips in a microwave-safe bowl and heat in 30-second intervals at 50% power, stirring in between each interval. This is super important because you don’t want to burn the chocolate. It should be mostly melted with a few lumps. Just keep stirring and those lumps will melt right away!
Step 8: Coat and Decorate
Alright, now for the fun part! Dip each chilled Butterfinger Ball into the melted chocolate, making sure it’s completely coated. You can use a fork or dipping tools for this. Lift the ball out of the chocolate and let any excess chocolate drip off. Place it back on the parchment-lined cookie sheet. Before the chocolate sets, sprinkle with additional crushed Butterfinger bars, festive sprinkles, or a dash of flaky sea salt. Get creative!
Step 9: The Grand Finale
Let the chocolate solidify completely before devouring your Butterfinger Balls! You can speed up the process by placing them in the refrigerator for a few minutes. And there you have it – delicious, homemade Butterfinger Balls ready to be enjoyed!
Tips for Perfect Butterfinger Balls
Ingredient Selection for the Best Butterfinger Balls
Okay, let’s talk ingredients! You might be tempted to grab any old peanut butter and chocolate, but trust me, a little extra thought here makes a HUGE difference. For the peanut butter, I really recommend sticking with a creamy, name-brand variety. The all-natural stuff can be too oily and make your Butterfinger Balls a little greasy. As for the chocolate? Go with what you love! Semi-sweet is my go-to, but milk chocolate is amazing too. Just make sure it’s good quality – you can really taste the difference!
Mixing Techniques for Smooth Butterfinger Balls
Listen, I know it’s tempting to just throw everything in a bowl and mix it all up at once, but resist that urge! For the smoothest, most delicious Butterfinger Balls, it’s all about proper mixing. Make sure your butter is *really* softened before you start (we’re talking “finger leaves an indent” soft!). And when you add the powdered sugar, do it gradually, on low speed. This will prevent a powdered sugar explosion in your kitchen (oops, been there, done that!).
Chilling Time for Easy Handling Butterfinger Balls
Don’t even *think* about skipping the chilling step! I know, I know, you’re probably eager to dive right in. But trust me on this one. Chilling those Butterfinger Balls in the freezer for at least 30 minutes is crucial. It firms them up so they’re much easier to roll and dip in chocolate. Otherwise, you’ll end up with a melty, sticky mess. And nobody wants that, right?
Butterfinger Balls Variations
Okay, so you’ve mastered the basic Butterfinger Balls recipe (yay!). Now, let’s get a little crazy and try some fun variations! This is where you can really let your creativity shine. Don’t be afraid to experiment – that’s how the best recipes are born!
Butterfinger Balls with Cream Cheese
Want to make your Butterfinger Balls extra creamy and decadent? Try adding cream cheese! Just mix in about 4 ounces of softened cream cheese with the peanut butter and butter. It adds a tangy richness that’s seriously addictive. Trust me, you’ll never go back!
Chocolate-Covered Butterfinger Balls
Let’s talk chocolate! While the original recipe calls for semi-sweet chocolate, the possibilities are endless. Dark chocolate adds a sophisticated bitterness, milk chocolate makes them extra sweet and kid-friendly, and white chocolate is just plain fun! You could even try melting different colored candy melts for a festive touch. How cute would red and green Butterfinger Balls be for Christmas?
Adding Candy Corn to Your Butterfinger Balls
Want to give your Butterfinger Balls a fun, festive twist? Chop up some candy corn and mix it into the dough along with the graham cracker crumbs and crushed Butterfinger bars. It adds a pop of color and a unique flavor that’s perfect for Halloween or Thanksgiving. Just be careful not to add too much, or they might get a little *too* sweet!
Storing Your Delicious Butterfinger Balls
Alright, so you’ve made a batch of these amazing Butterfinger Balls… and maybe, *just maybe*, you have some leftovers (ha!). No worries, I’ve got you covered. Here’s how to keep those little guys fresh and delicious!
How to Store Butterfinger Balls
The best way to store your Butterfinger Balls is in an airtight container in the refrigerator. They’ll stay fresh for about a week, maybe even a little longer if you’re lucky! Just make sure they’re not squished or crowded in the container, or they might get a little misshapen. Nobody wants a flat Butterfinger Ball!
Freezing Butterfinger Balls for Later
Want to make a big batch of these ahead of time? No problem! Butterfinger Balls are super freezer-friendly. Just place them in a single layer on a baking sheet and freeze for about 30 minutes, or until they’re solid. Then, transfer them to a freezer-safe bag or container. They’ll keep in the freezer for up to 2-3 months. When you’re ready to eat them, just let them thaw in the refrigerator for a few hours, or at room temperature for about 30 minutes. They’ll be just as delicious as the day you made them!
Frequently Asked Questions About Butterfinger Balls
Can I use natural peanut butter in these Butterfinger Balls?
Okay, so you’re all about that natural life, I get it! But honestly, for these Butterfinger Balls, I really don’t recommend using natural peanut butter. It tends to be too oily, and it can make the balls a little greasy and not hold their shape as well. But if you’re really set on using it, try adding a tablespoon or two of powdered sugar to help absorb some of the excess oil. Or, better yet, stick with a regular creamy peanut butter – you know, the kind that’s not *quite* as “healthy” but tastes amazing in these treats!
How long do Butterfinger balls last?
If you manage to resist eating them all in one sitting (which, let’s be honest, is a challenge!), these Butterfinger Balls will last for about a week in the fridge. Just keep them in an airtight container to prevent them from drying out. And if you want them to last even longer, you can totally freeze them! They’ll keep in the freezer for up to 2-3 months. Now, that’s what I call planning ahead!
Can I make these Butterfinger Balls ahead of time?
Absolutely! These Butterfinger Balls are the perfect make-ahead dessert. You can make the dough, roll them into balls, and then freeze them until you’re ready to dip them in chocolate. Or, you can go ahead and dip them in chocolate and then freeze them. Either way, they’ll be ready to go whenever you need a sweet treat. Just thaw them out for a few hours before serving, and they’ll be as good as new. It is truly my favorite way to meal prep desserts!
Can I add more graham cracker crumbs to the Butterfinger Balls?
You know, I get asked this a lot! While it’s tempting to add more graham cracker crumbs to make the Butterfinger Balls less sticky, I wouldn’t recommend it. The graham cracker crumbs help to bind the dough together and give it a nice texture, but too much can make the balls dry and crumbly. Stick to the ¾ cup that the recipe calls for, and you’ll be golden. If your dough is still too sticky, try chilling it for a little longer before rolling it into balls. That should do the trick!
Nutritional Information for Butterfinger Balls
Okay, so let’s talk numbers! I know, I know, it’s not the *most* exciting part of making these delicious Butterfinger Balls, but it’s good to know what you’re getting into, right? Keep in mind, these are just estimates, and they can vary depending on the exact ingredients you use. But here’s a general idea of what you can expect per ball:
- Serving Size: 1 ball
- Calories: About 150 (hey, you deserve a treat!)
- Sugar: 15g (told ya they were sweet!)
- Sodium: 50mg (not too bad, right?)
- Fat: 8g (peanut butter and chocolate – gotta have some fat!)
- Saturated Fat: 4g
- Unsaturated Fat: 3g
- Trans Fat: 0g (yay!)
- Carbohydrates: 18g
- Fiber: 1g (every little bit helps!)
- Protein: 2g (a little protein boost!)
- Cholesterol: 10mg
So, there you have it! Now you can enjoy your Butterfinger Balls with a little extra knowledge. And hey, everything’s okay in moderation, right?
Loved These Butterfinger Balls?
Okay, you guys, I seriously hope you loved these Butterfinger Balls as much as my family and I do! If you gave this recipe a try, I would absolutely LOVE to hear about it! Did you add any fun variations? Did the kids help? Tell me everything in the comments below!
And hey, if you’re feeling extra generous, I’d be super grateful if you could rate this recipe! It helps other folks find it, and it lets me know what you’re loving. Plus, feel free to share your masterpieces on social media! Tag me so I can see your creations – I’m always so inspired by your baking adventures. Happy Butterfinger Ball-ing!
If you are looking for more no-bake dessert recipes, check out my latest recipes!

You might also enjoy my Air Fryer Apples Healthy Snack Dessert Recipe.
For another kid-friendly recipe, try my Crispy Air Fryer Dino Nuggets Recipe Made Easy.
If you’re looking for information on food safety, the FoodSafety.gov website is a great resource.
Want to learn more about the history of the Butterfinger candy bar? Check out this article on the Candy Hall of Fame.
Print
Devilish 5-Ingredient Butterfinger Balls Recipe
- Total Time: 1 hour
- Yield: About 24 balls 1x
- Diet: Vegetarian
Description
Easy no-bake Butterfinger Balls recipe with peanut butter and crushed candy bars. Perfect for holiday desserts and quick treats.
Ingredients
- 4 tablespoons softened butter (½ stick)
- 1 teaspoon vanilla extract
- 8 ounces chocolate bark or chocolate chips
- ½ cup Butterfinger bars, crushed
- 1 cup powdered sugar
- 1 cup peanut butter (avoid all-natural varieties)
- ¾ cup graham cracker crumbs
- Optional garnishes: additional crushed Butterfinger bars, festive sprinkles, or coarse sea salt
Instructions
- Prepare the Dough: In a mixing bowl, combine the peanut butter and softened butter. Use an electric or stand mixer set to medium speed and blend until the mixture is creamy and uniform.
- Add Aromatic Notes: Incorporate the vanilla extract and blend thoroughly.
- Sweeten the Deal: Gradually add the powdered sugar in increments, blending at a low speed. Scrape down the sides of the bowl to ensure even mixing.
- Crunch Time: Gently fold in the graham cracker crumbs and crushed Butterfinger bars.
- Shape ’em Up: Align a large cookie sheet with parchment paper. Scoop out approximately 1 to 1½ tablespoons of the dough, roll into neat balls, and place on the cookie sheet.
- Chilling Phase: Freeze the dough balls on the sheet for roughly 30 minutes until they are completely firm.
- Melting the Chocolate: Once the dough balls are chilled, proceed to melt the chocolate. Utilize a microwave-safe bowl and heat in 30-second spurts at 50% power, stirring in between each interval. Be cautious not to overheat; some lumps should remain and will melt as you stir.
- Coat and Decorate: Submerge each chilled ball into the melted chocolate. You can fully coat them or leave a bit of the peanut butter mixture exposed.
- Finishing Touches: Add a sprinkle of additional crushed Butterfinger bars, holiday-themed sprinkles, or a dash of flaky sea salt for that extra pop.
- The Grand Finale: Allow the chocolate to solidify completely before indulging in your Butterfinger Bliss Balls.
Notes
- For variation, consider adding cream cheese, Rice Krispies, or candy corn.
- These balls are freezer-friendly for quick treats.
- Prep Time: 20 minutes
- Cook Time: 10 minutes
- Category: Dessert
- Method: No-Bake
- Cuisine: American
Nutrition
- Serving Size: 1 ball
- Calories: 150
- Sugar: 15g
- Sodium: 50mg
- Fat: 8g
- Saturated Fat: 4g
- Unsaturated Fat: 3g
- Trans Fat: 0g
- Carbohydrates: 18g
- Fiber: 1g
- Protein: 2g
- Cholesterol: 10mg
Keywords: Butterfinger Balls, Butterfinger Truffles, No-Bake Butterfinger Bites, Chocolate Peanut Butterfinger Balls, Butterfinger Candy Balls, Butterfinger Dessert Bites, Mini Butterfinger Bombs, Peanut Butter Butterfinger Balls, Easy Butterfinger Treats, no-bake dessert, homemade candy